Archive for the ‘wayne yoshida’ Tag

Announcing San Diego Mini Maker Faire 2013 – Visit the Maker Booth called “Not Your Grandpa’s Ham Radio”
Here’s a quick overview of Maker Faire projects from past “Not Your Grandpa’s Ham Radio” exhibits. . .

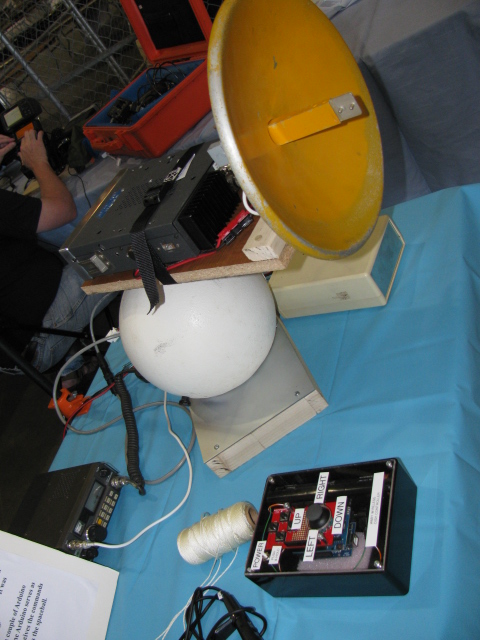
The KH6WZ 10 GHz (X-band) transmitter-receiver unit on display at the Orange County Mini Maker Faire on the UCI campus

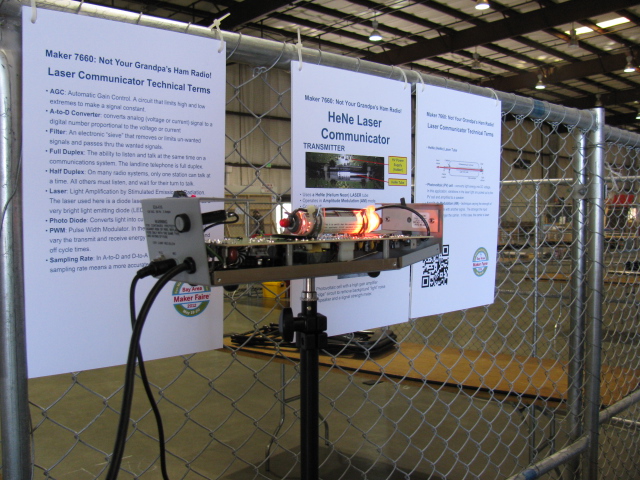
A vintage Helium-Neon (HeNe) laser communicator by Dennis W6DQ – from the 2012 Bay Area Maker Faire

An audio frequency test station with an oscilloscope, signal generator and audio amplifier. A microphone inserted into the amplifier input became a popular function for kids and adults – Speak into the microphone and see what you sound like!

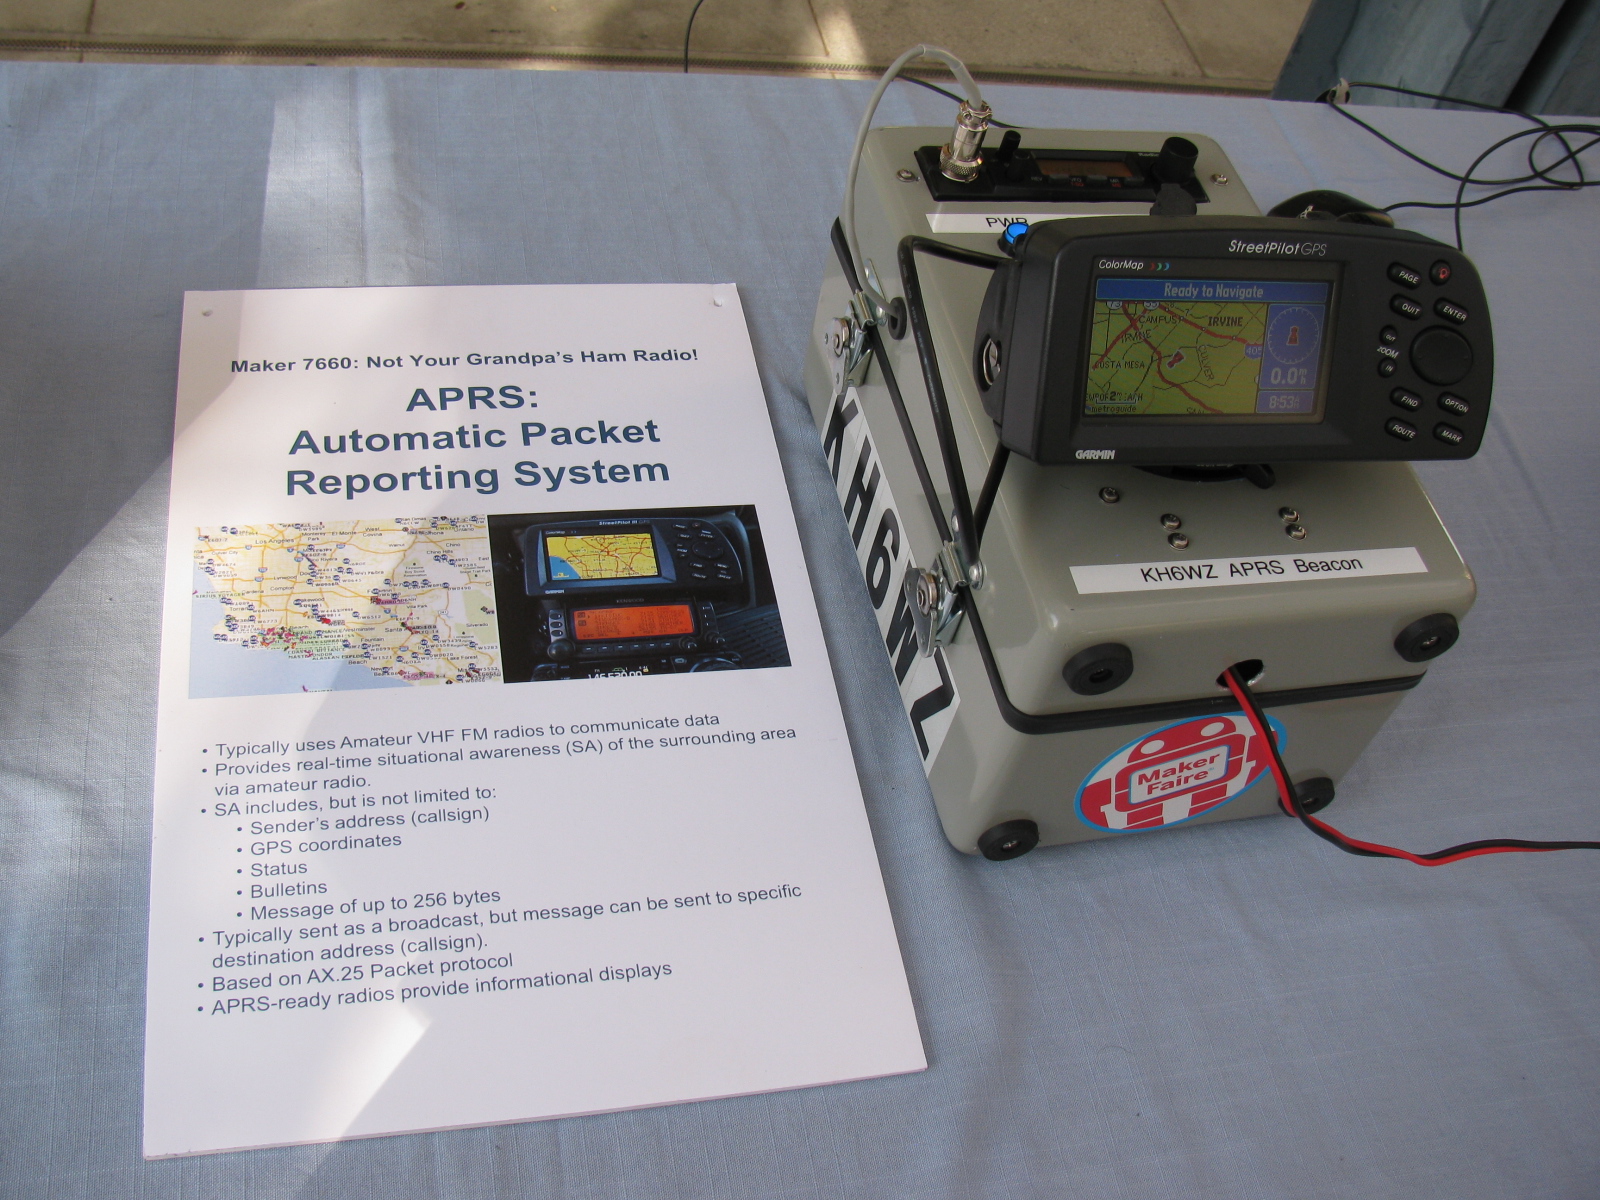
KH6WZ-5 APRS beacon – active and sending position data at the 2013 OC Mini Maker Faire at UCI. The beacon message included the Faire’s URL.

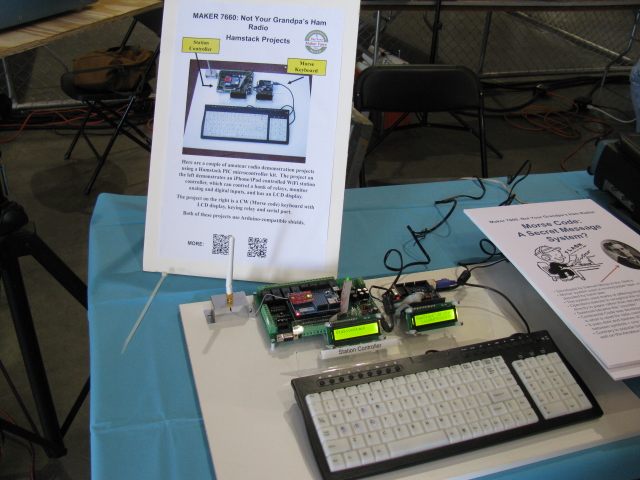
Morse Code reader/sender with wireless keyboard and radio interface by Brian W6BY. This setup uses Ham Stack modules available from Sierra Radio

“Space Ball” azimuth-elevation antenna positioner, with wireless remote control and iPhone interface, by Brian W6BY

KH6WZ APRS beacon sending out the Discovery Science Center location

Not Your Grandpa’s Ham Radio 2012 Bay Area Maker Faire team – Left to Right: Brian W6BY, Dennis W6DQ, Wayne KH6WZ, Tony KC6QHP, and Mike Lavelle K6ML

Jeri Ellsworth – aka Circuit Girl – at the 2012 Bay Area Maker Faire. She’s playing her 8-bit bass key-tar.
More projects coming soon, so stay tuned!
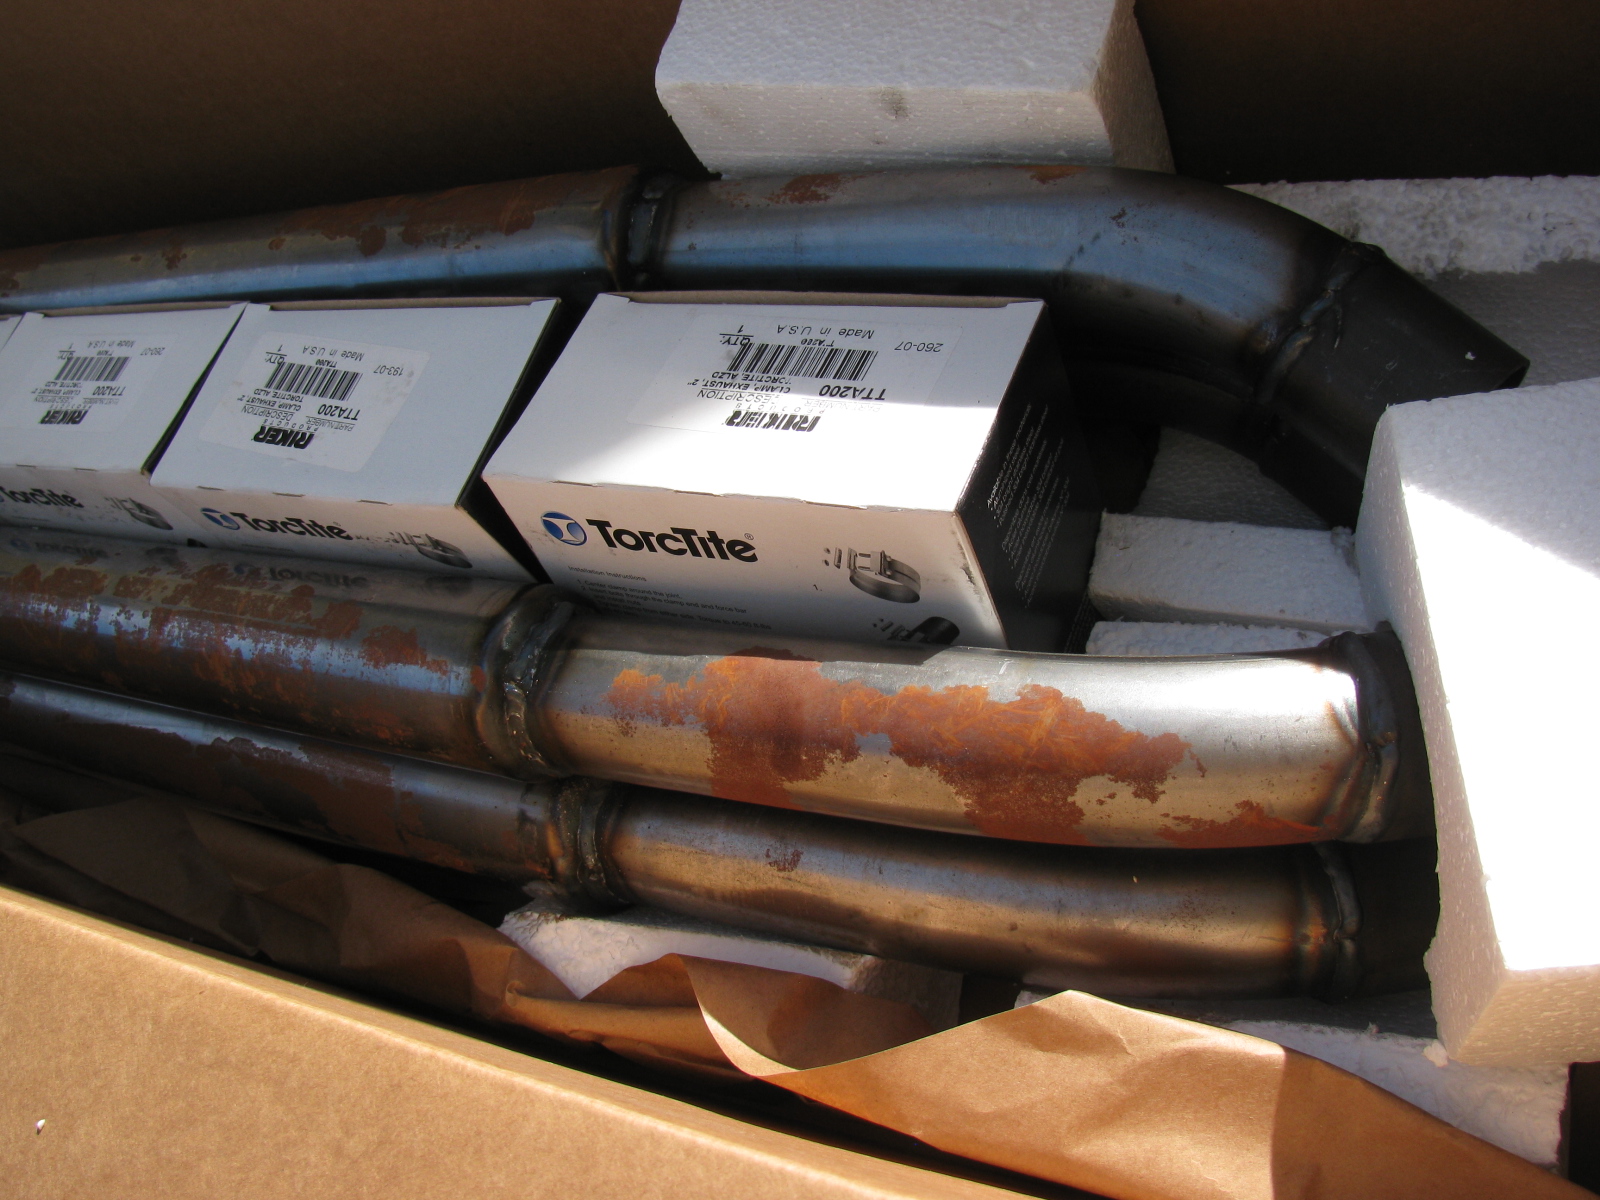
I got bored with figuring out the fuel line routing and filtering, and it was a nice warm day today, so I decided to paint the Coupe exhaust system pipes and silencers. Even though they were stored in a corner of my dining room, and were covered with oil, there was a lot of rust forming on the surface of the pipes. My kit is now a little over a year old, and I wanted to prevent further rusting.
Here is the box of pipes and associated mounting hardware from The Factory. . .

Type 65 Coupe Exhaust, Uncoated, from Factory Five Racing, after one year
There is an option to get the pipes ceramic coated, I probably should have ordered the exhaust with the coating. I noticed the brochure on the Factory Five Racing website has the exhaust listed as ceramic coated at no charge. I wonder why I missed that part?
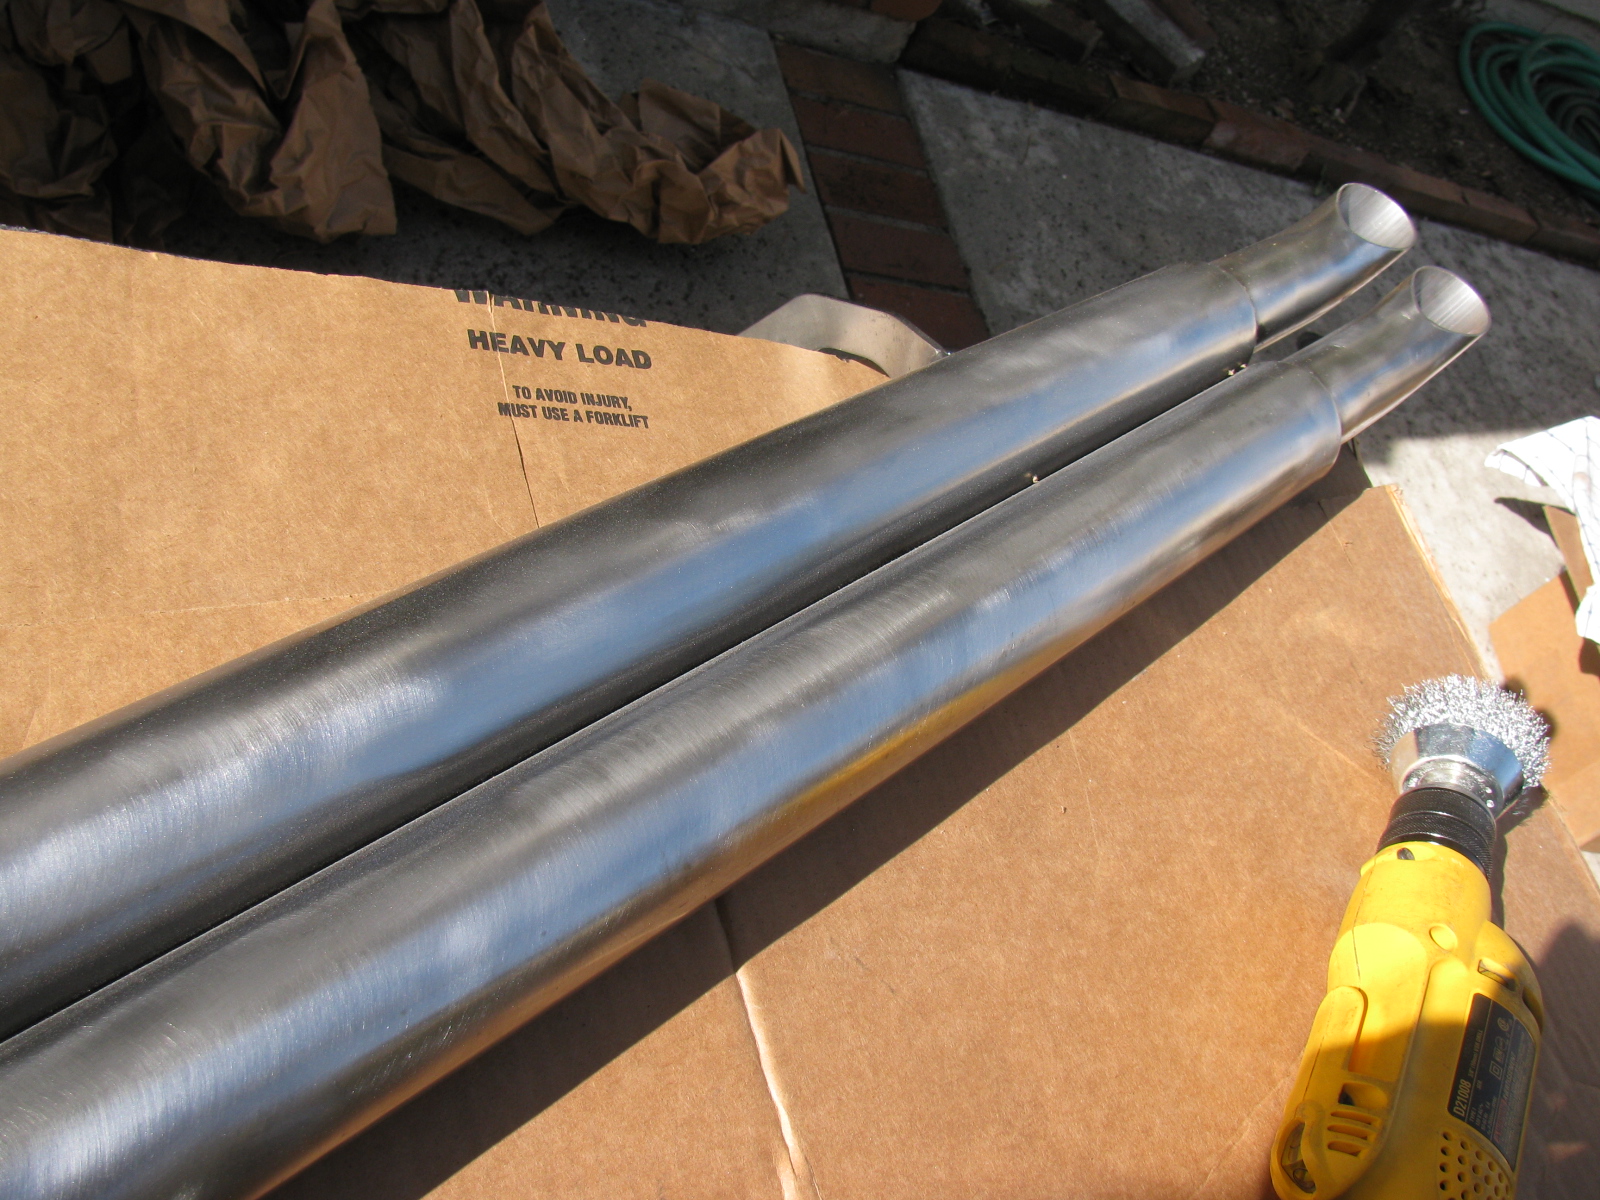
I used silver Rustoleum BBQ paint (Ultra) to finish the exhaust. But first, I prepped the pipes with wire brushes, to remove the rust and roughen up the surface, and then wiped them with acetone to degrease so the paint will stick better.

I used a wire brush on a drill motor to get the rust off and roughen the surface.

Type 65 Coupe side exhaust pipes painted with silver BBQ paint – I think it looks OK.
The BBQ paint is a bit soft, I think this is because it needs to expand and contract when heated and cooled. But it will be easy and cheap to touch up.
I am not sure what the final exhaust side pipe color will be, so I sprayed three coats of the silver on just to prevent further rusting. I may change the color to black, since I want the main body to be white.
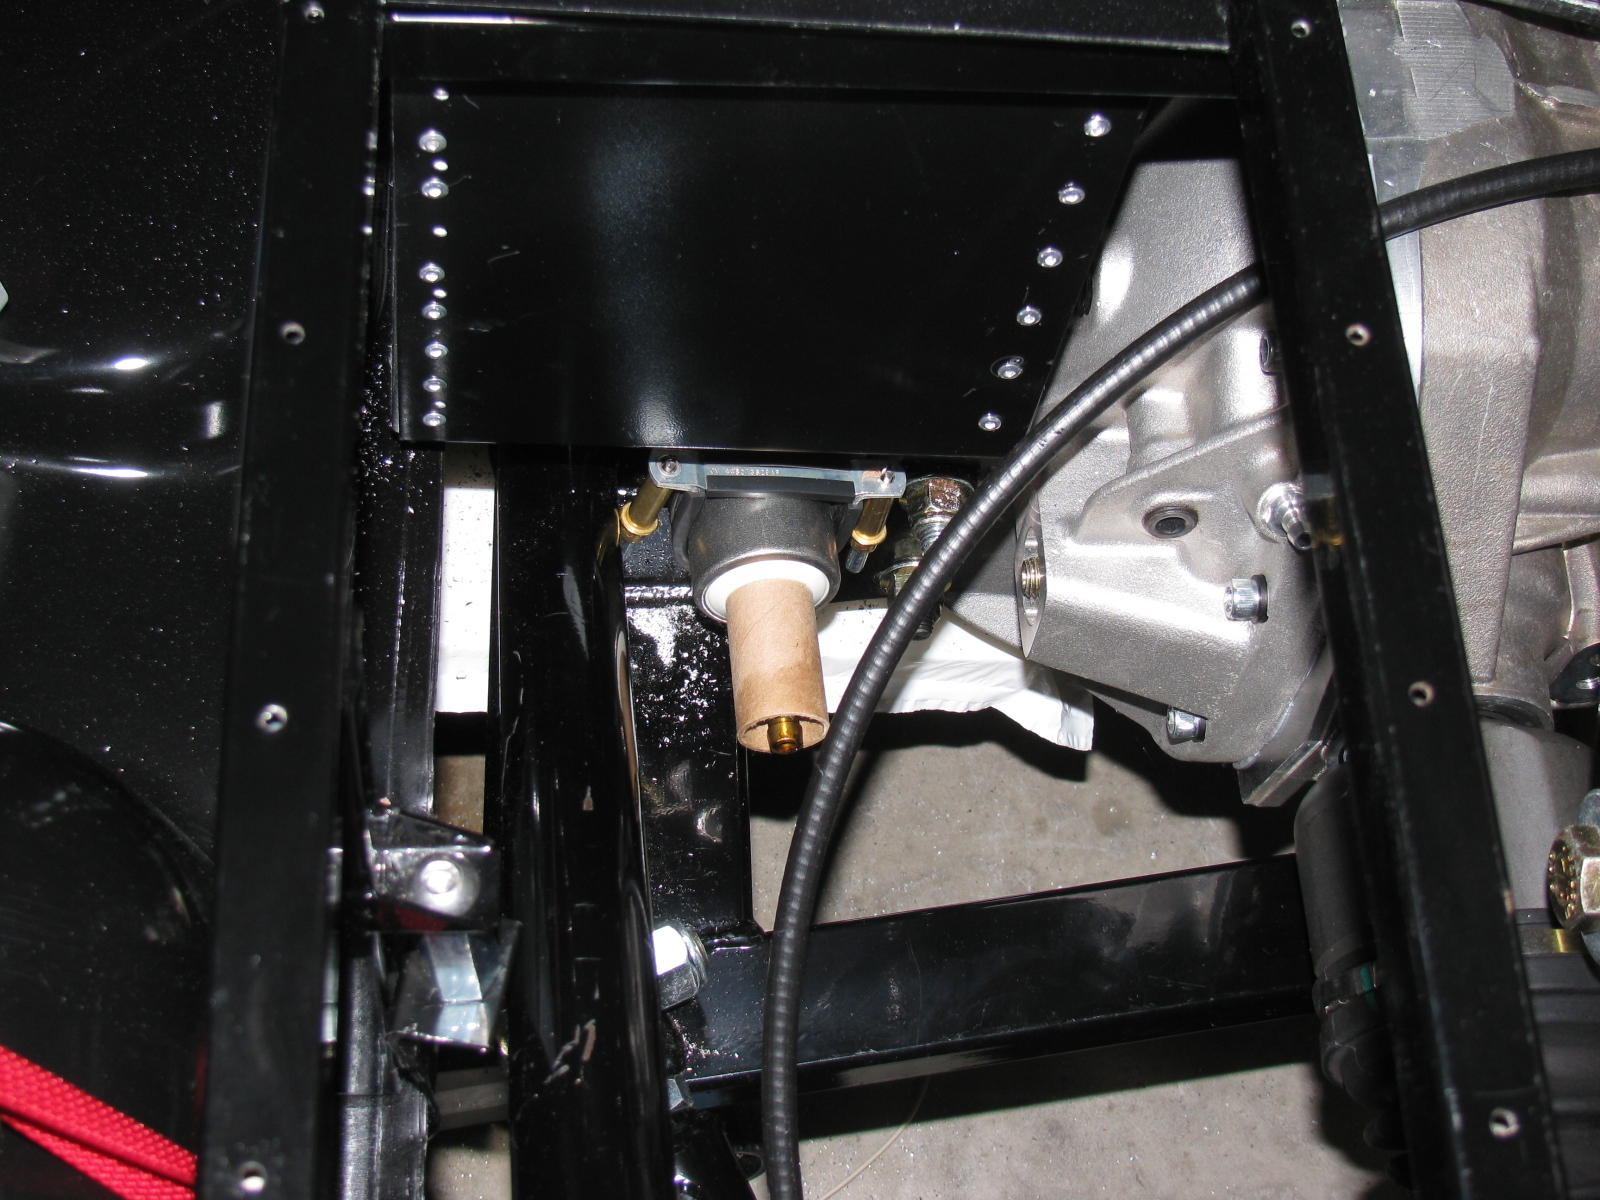
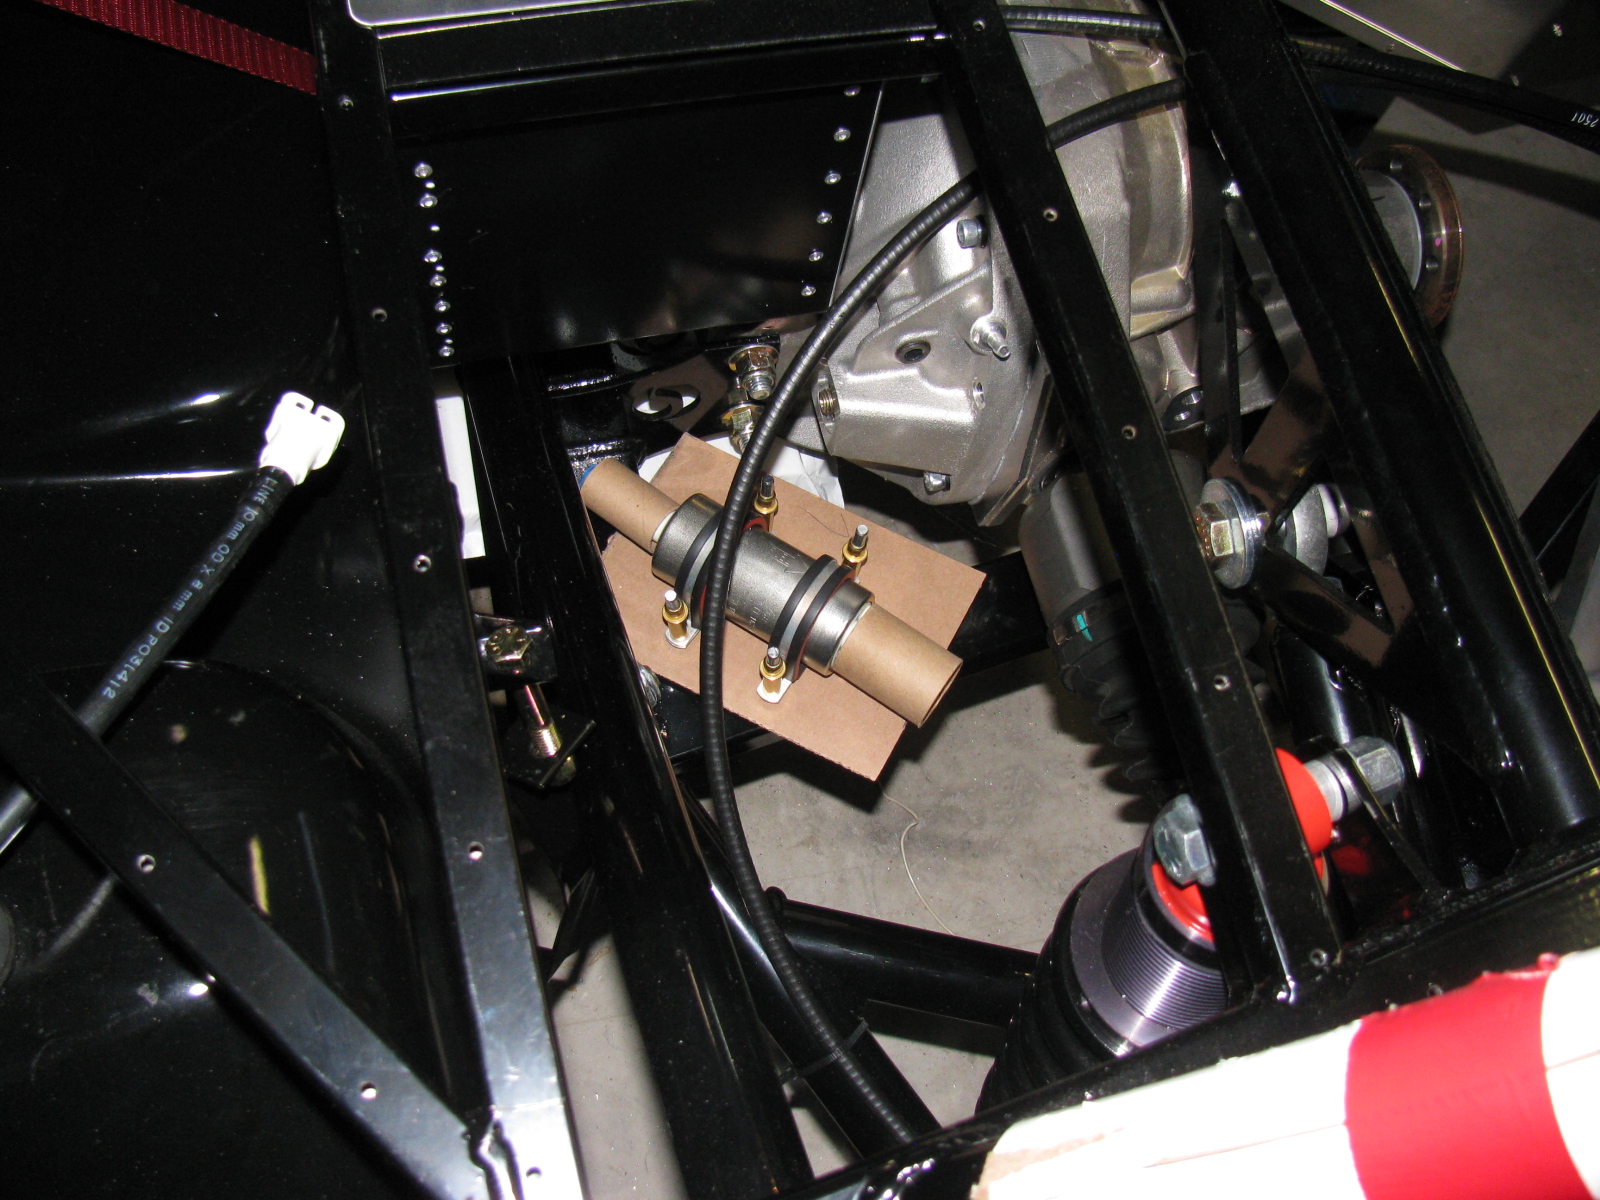
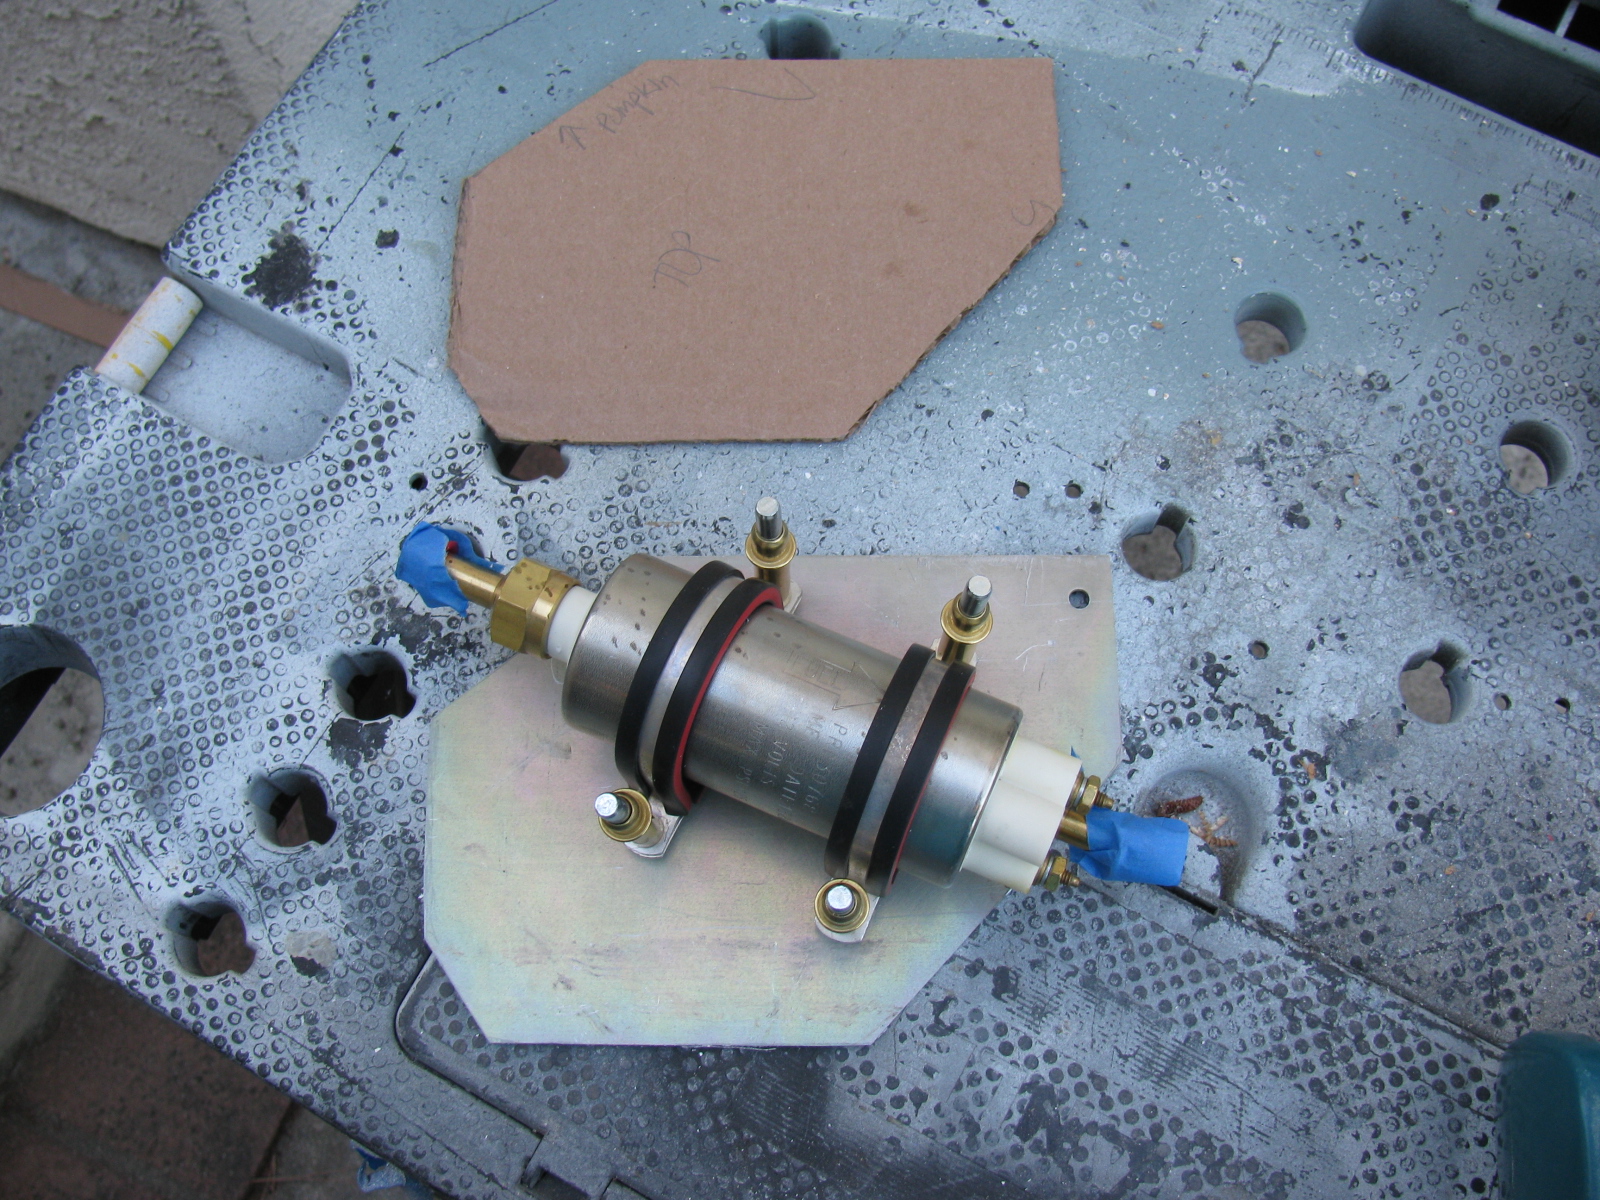
I did manage to mount the pre-filter for the fuel system. My 302 is fuel injected with an MSD Atomic EFI system, and came with most of the parts, including the fuel filters, hose, and external fuel pump. The first filter mounts where the Factory Five fuel filter is located, near the quad shock mount on the right side of the chassis. The MSD-supplied filter is smaller than the one supplied in the kit, so I had to figure out how to mount it. I am using a pair of electrical conduit clips to mount the first filter, as shown.

Electrical conduit clips are used to mount the first fuel filter to the chassis
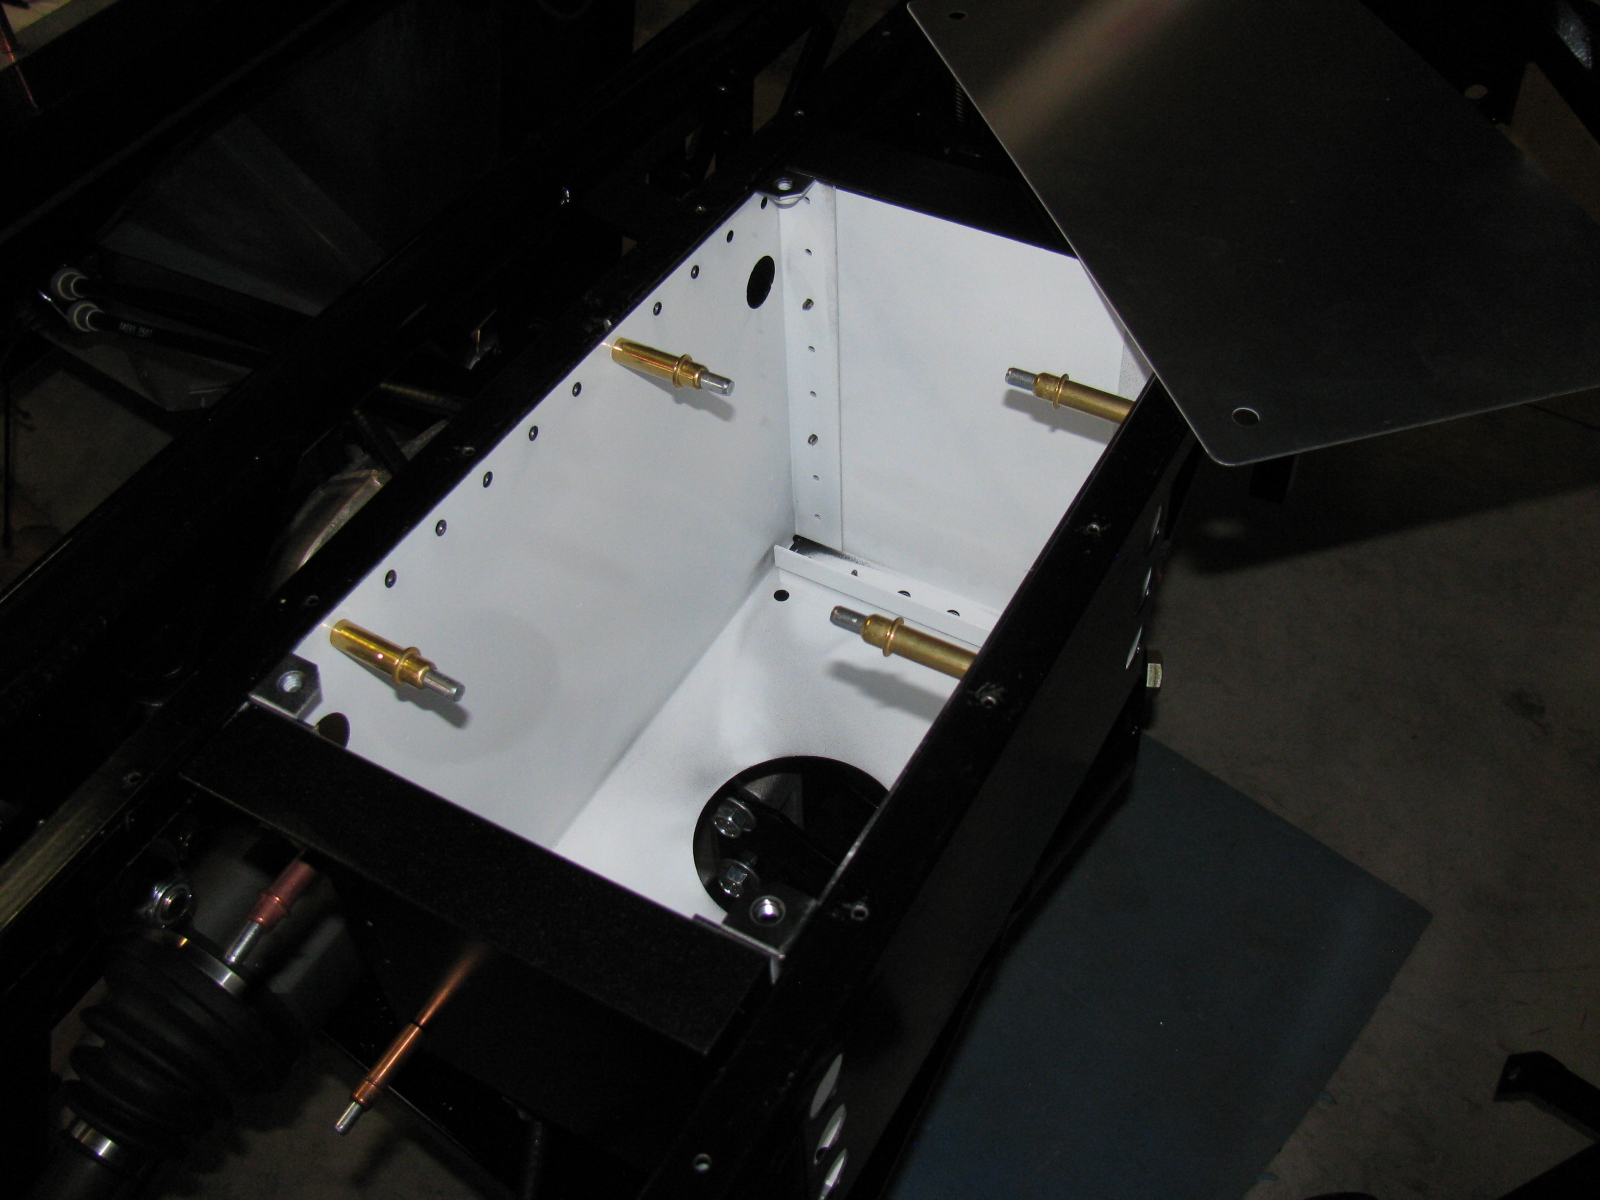
The fuel pump will mount to the bottom of the Factory Five Metal battery box. If you have IRS and want to use the same box, you must modify the battery box slightly, as mentioned in an earlier post. In addition, you will have to figure out how to make the battery box removable, since it will block the differential filler plug.
I will be mounting the battery box with nuts and bolts, and mount it so that it can tilt upwards for access to the rear end filler plug. More details and pictures will follow when I get to that chore. Here’s a sneak peek at where the external fuel pump will be mounted.

Type 65 Coupe with IRS – battery box and external fuel pump mounting location
I love a good pastrami sandwich. The salty, peppery, thinly-sliced meat on a toasted bun with a little mustard kind of pastrami sandwich, like they serve at a place in West Los Angeles (Culver City) called Johnnie’s Pastrami. Amazingly, my dad used to go there when he was a single dude in the 1950s. . . . and he brought us kids there. I still remember the bowl of pickles and the giant box of French fries – and of course, the pastrami sandwich. On the Johnnie’s Pastrami “About” page, it says, “Johnnie’s Pastrami was established in 1952 and has become a Southern California landmark. The juke boxes on the counters and booths are all original. So are some of the waitresses.”
So when I saw the Turkey Pastrami on the first season of Primal Grill (on DVD), I had to give it a try. It was several summers ago, and I looked at several supermarkets for a turkey breast, but couldn’t find any. So I made it with chicken breasts instead. And it tasted great!
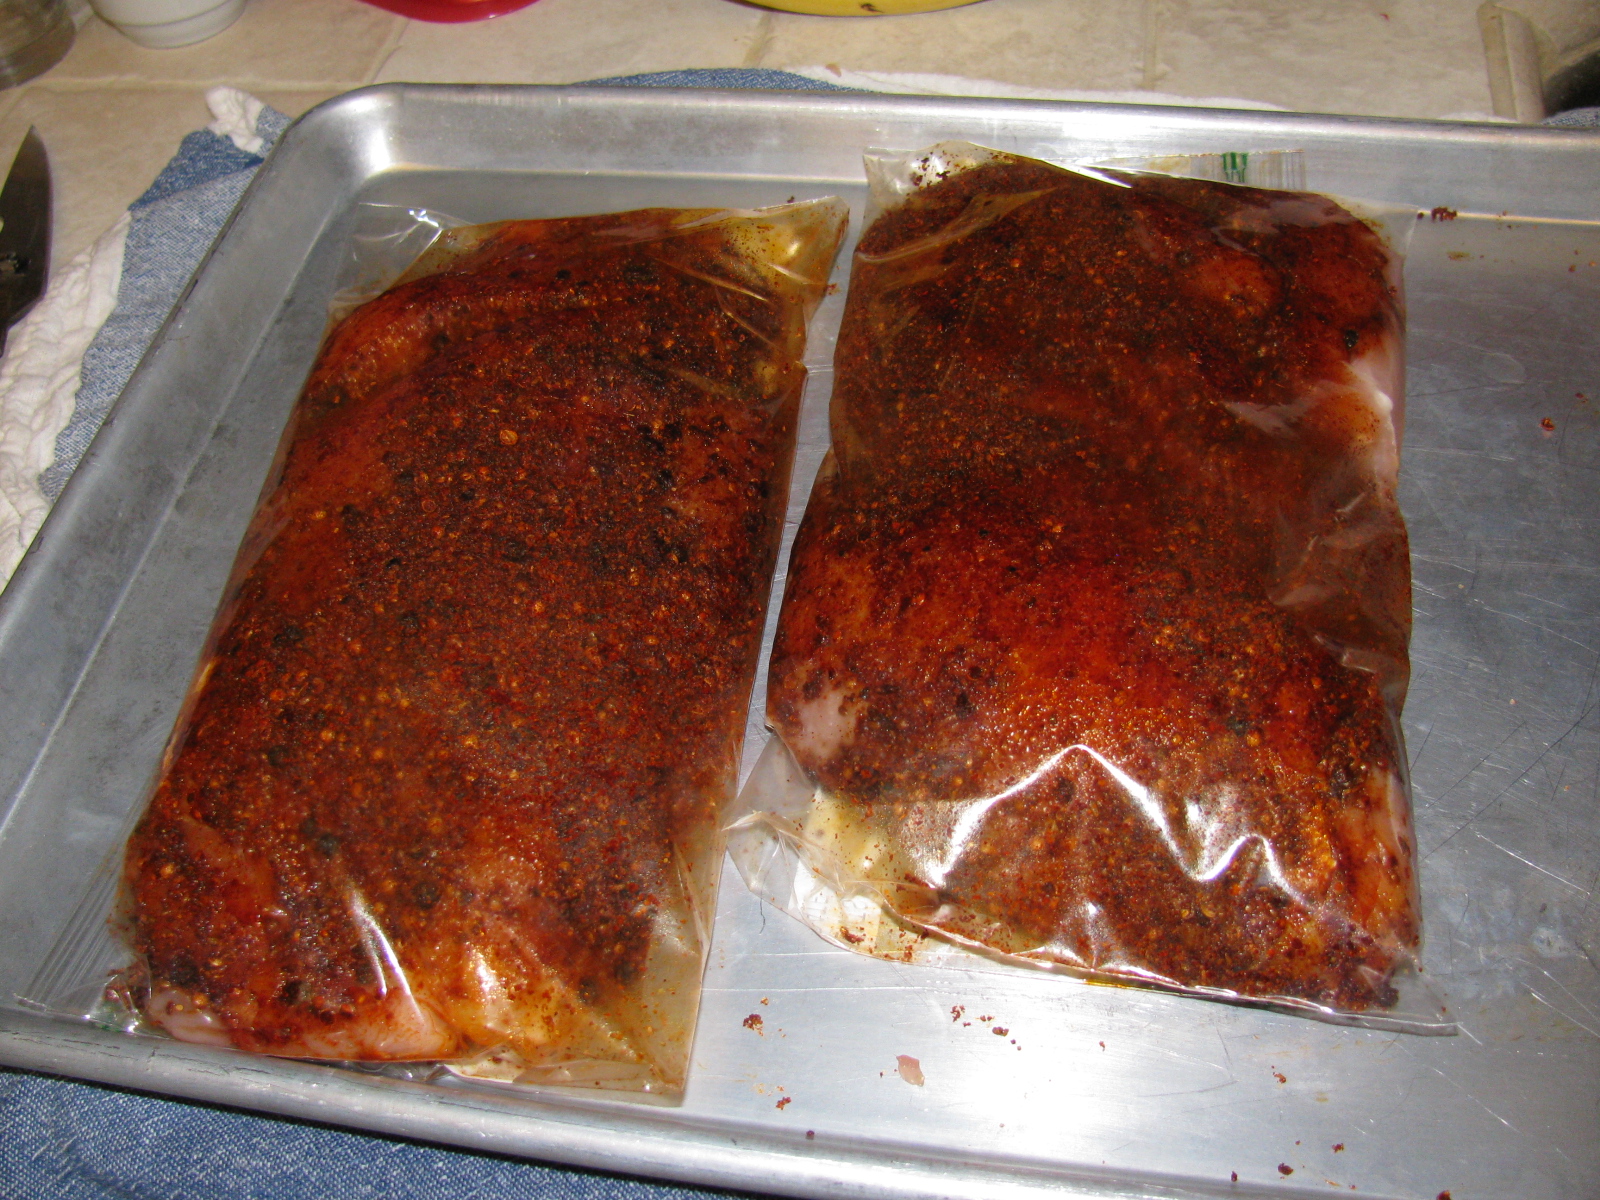
Earlier today, I made turkey breast pastrami – and it is equally good, although a little on the too salty side for me. I think this is because I marinated the turkey breasts too long (almost 2 days) instead of 24 hours. I will try it again to see if I can get a better result.
Here’s how we did today. . . . .. .

Dry rub marinade for turkey pastrami

On the Big Green Egg – 250 degrees F, with some hickory chips.

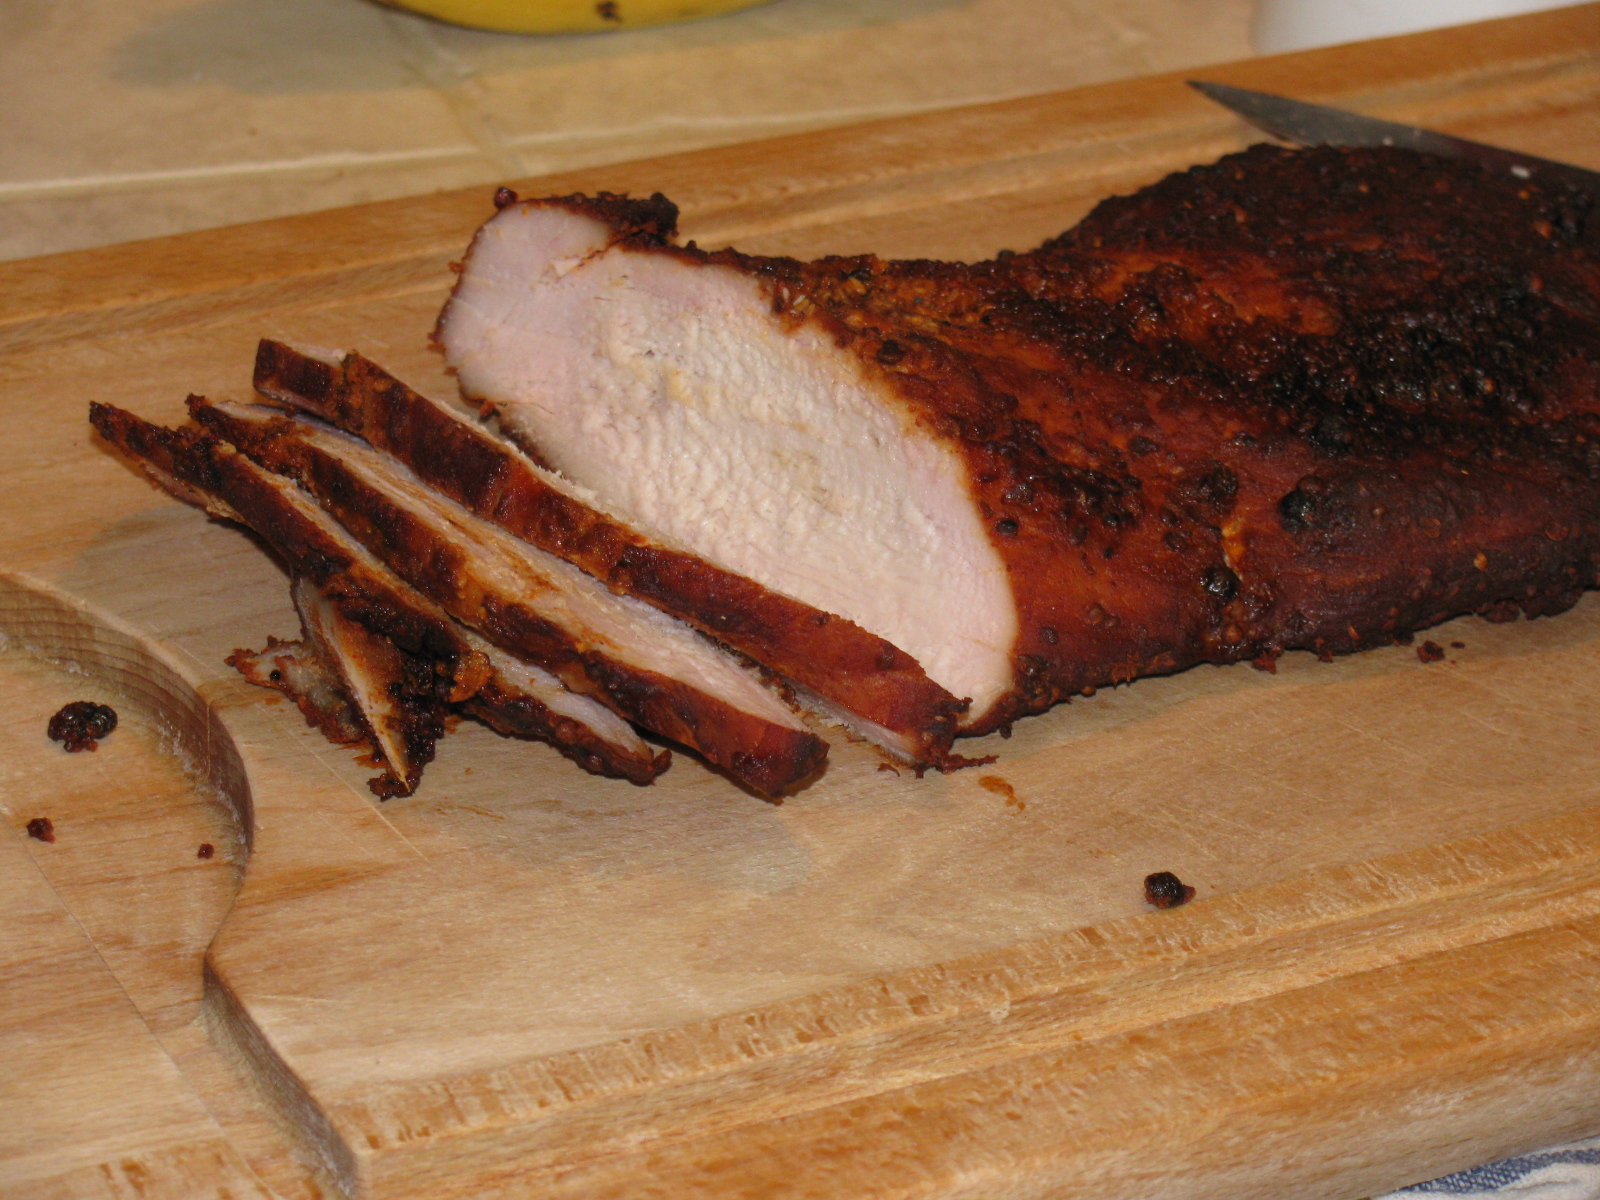
Slicing the turkey pastrami – so juicy it squirts!

A plate of turkey pastrami slices
I had a whole sack of leftover dinner rolls from Thankgiving. Rather than make something boring like croutons, I decided to make some bread pudding. Oddly, bread pudding is not one of my favorites, but I decided to customize a basic recipe by adding some more sweet stuff.
I roughly based my version on a recipe from Williams-Sonoma and added a quarter cup of chocolate chips and one very ripe banana.
Now – this is so much better.
No, this did not go into the Big Green Egg, but maybe I will try that next time – maybe a savory bread pudding can be made, like this idea from Cooking Light. . .
Here are some pictures:

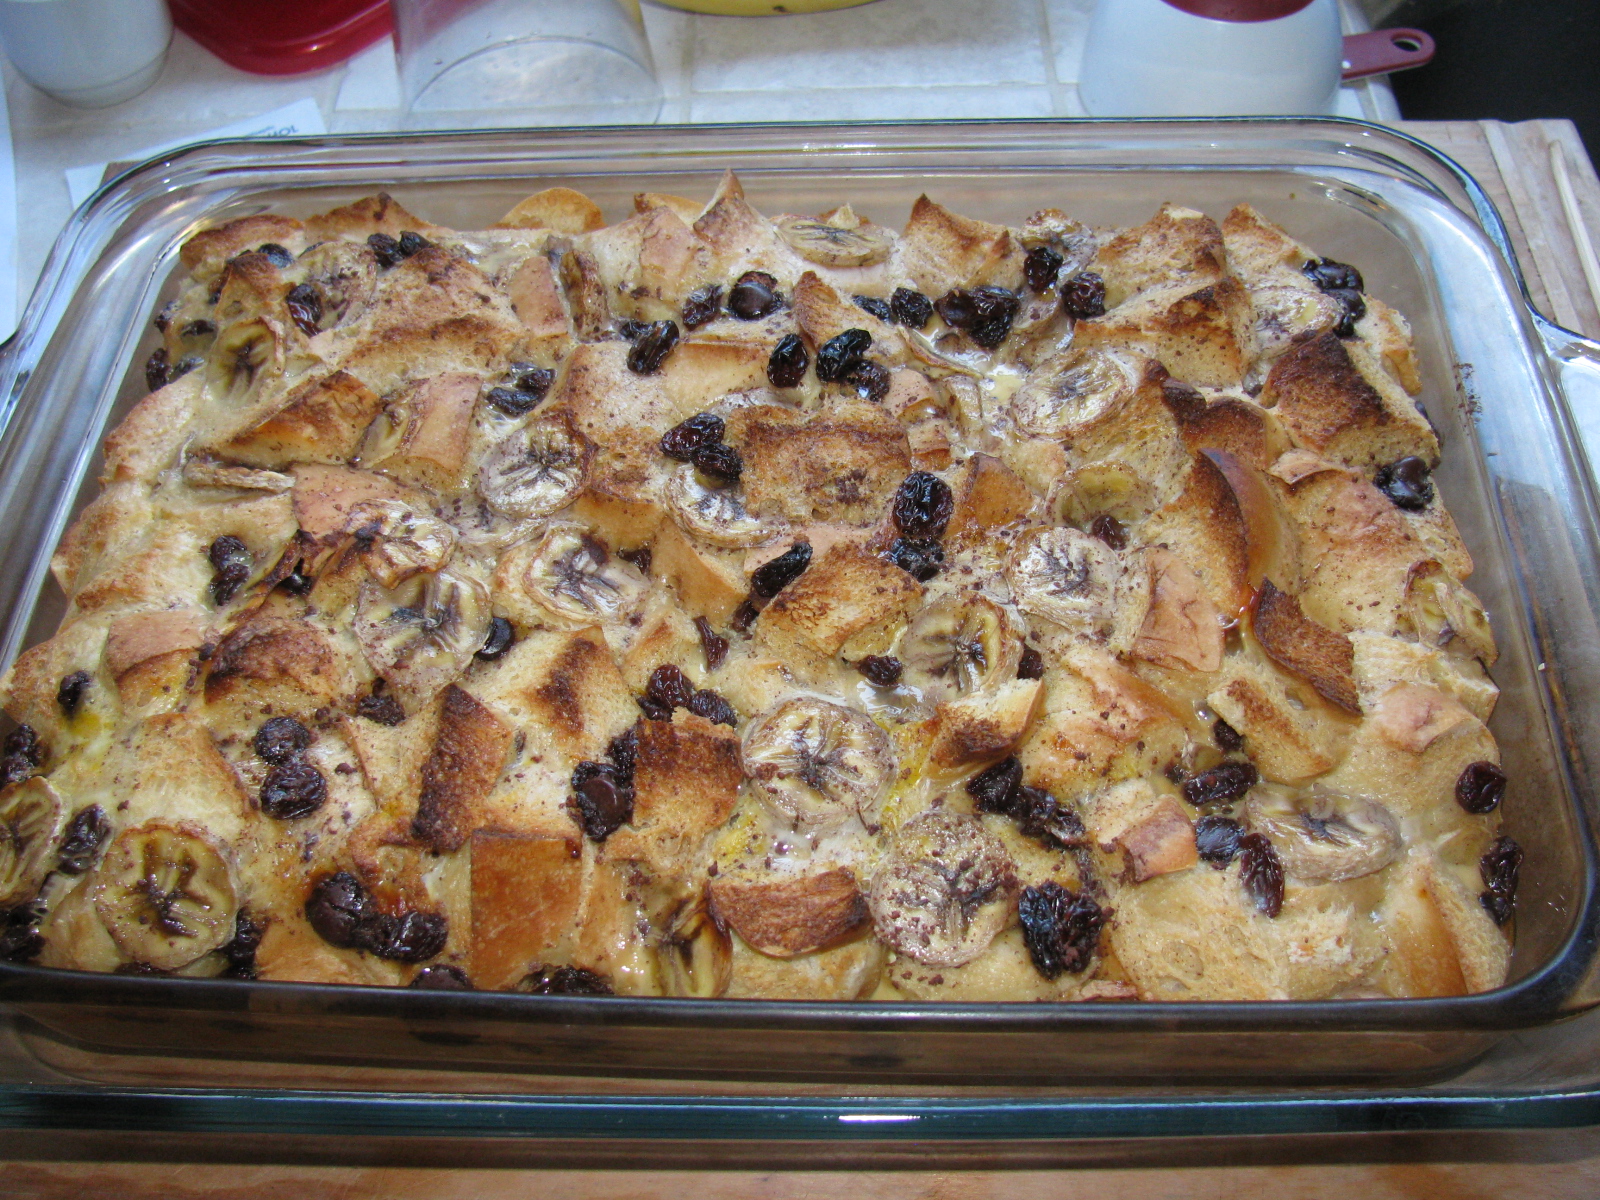
KH6WZ Bread Pudding with Bananas, Raisins and Chocolate Chips – ready for the oven

KH6WZ Bread Pudding with Bananas, Raisins and Chocolate Chips – fresh from the oven

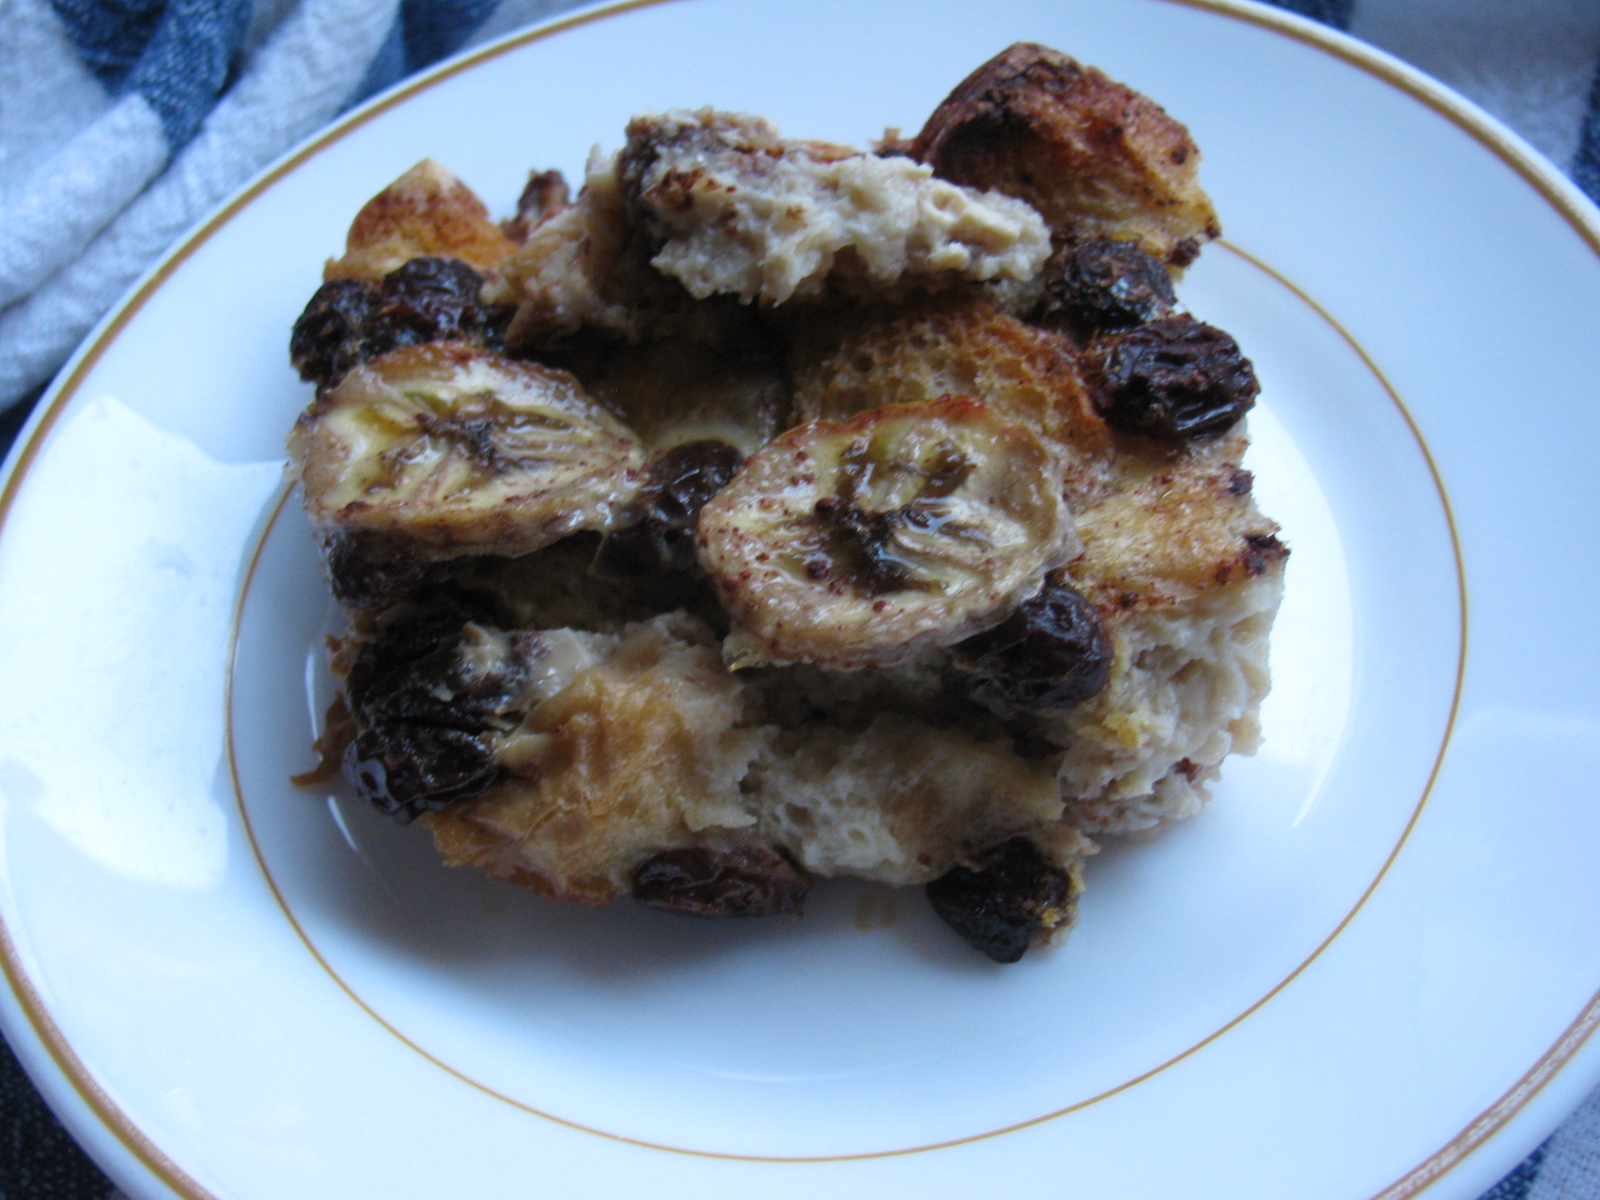
KH6WZ Bread Pudding with Bananas, Raisins and Chocolate Chips – I wish I had some ice cream to go with this puddin’
-
-
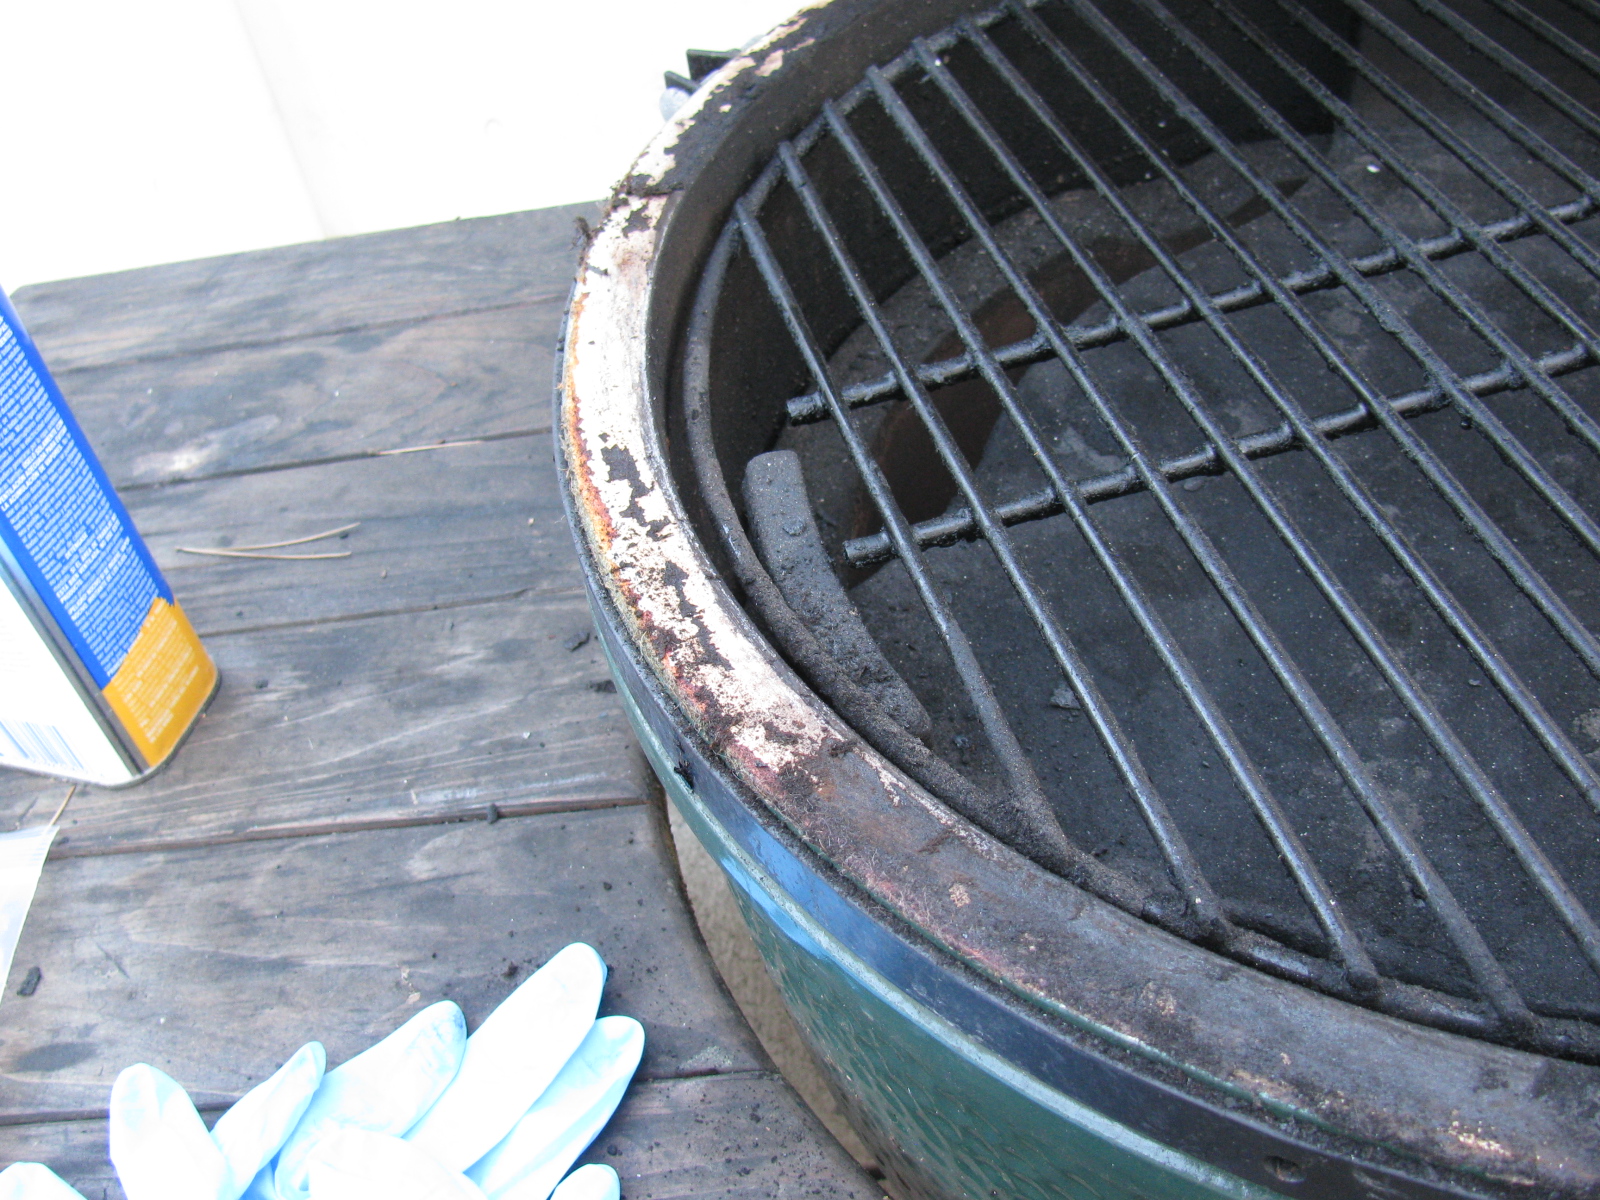
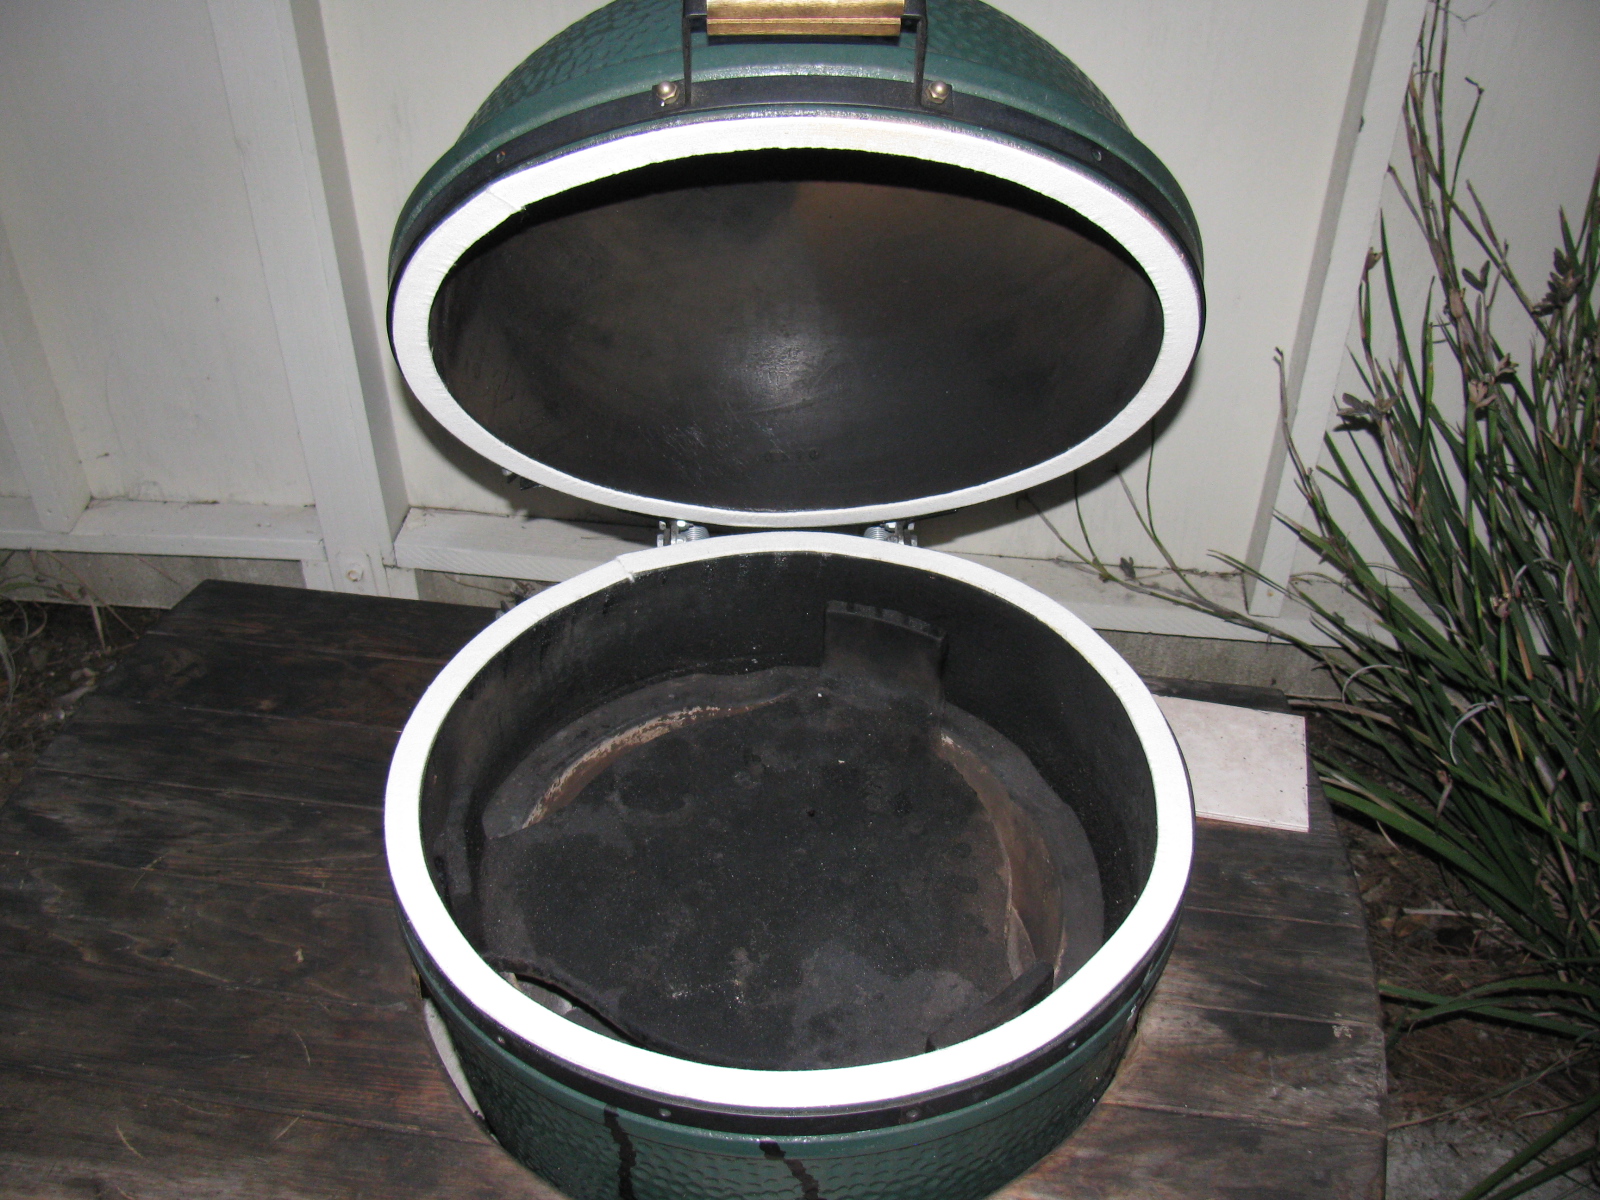
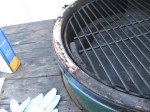
The gasket on my Big Green Egg finally wore out. After three years, the gasket hardened and had a few “bald” spots.
-
-
Rather than working upside down, I removed the lid portion of the BGE from the hinge assembly.
-
-
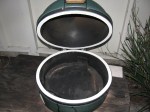
The old gasket was scraped off to bare ceramic. Acetone was used to de-grease and clean the surfaces.
-
-
New gasket in place. Easily done in a few minutes.
-
-
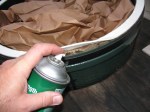
3M super strength adhesive (a spray-on contact cement) was used to fasten the gasket to the bottom and top rim. Butcher paper was used to help limit over-spray going into the interior of the BGE.
-
-
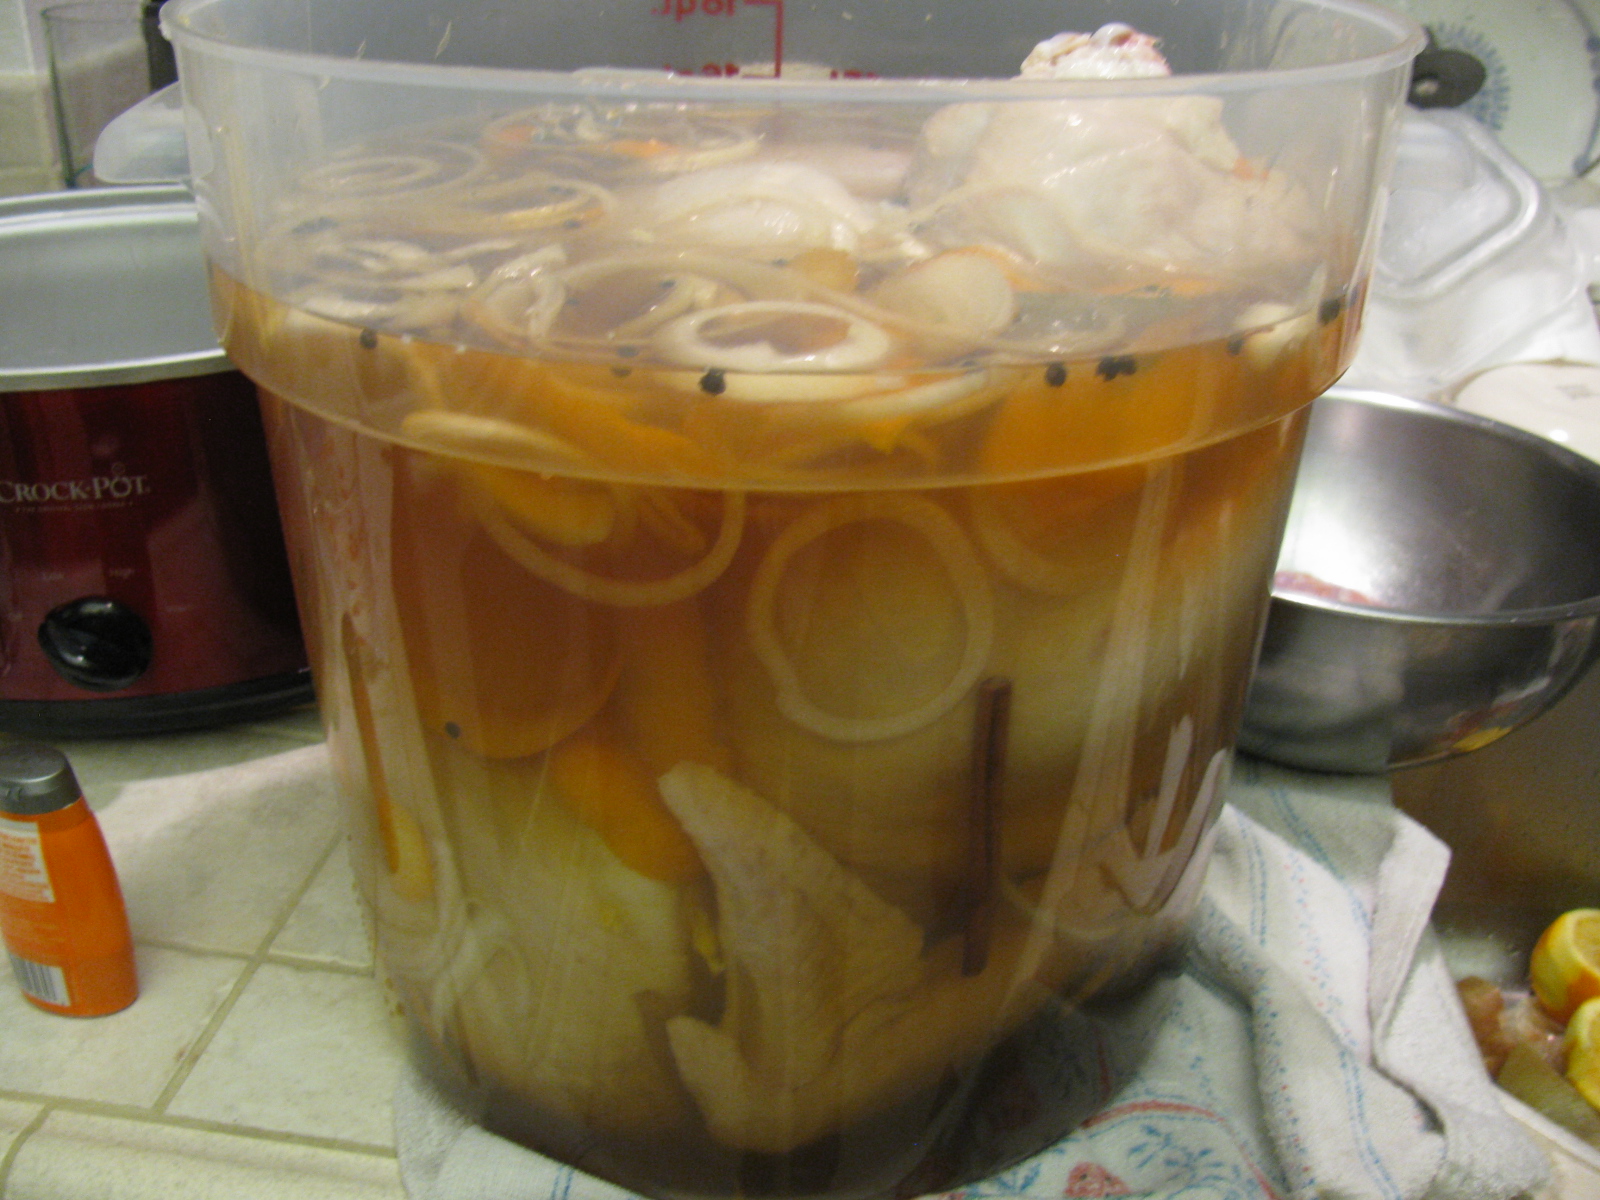
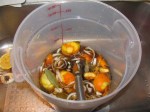
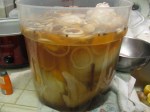
My secret for a juicy and tasty turkey: Brining. I use the Orange Brine recipe from Primal Grill, Season 3. (Orange-Brined Turkey Breast)
-
-
The 20-lb hen swimming in the orange brine. I started late, it is best to soak the turkey for at least 24 hours – I brined for only 12 hours – but it was still moist and tasty!
-

-
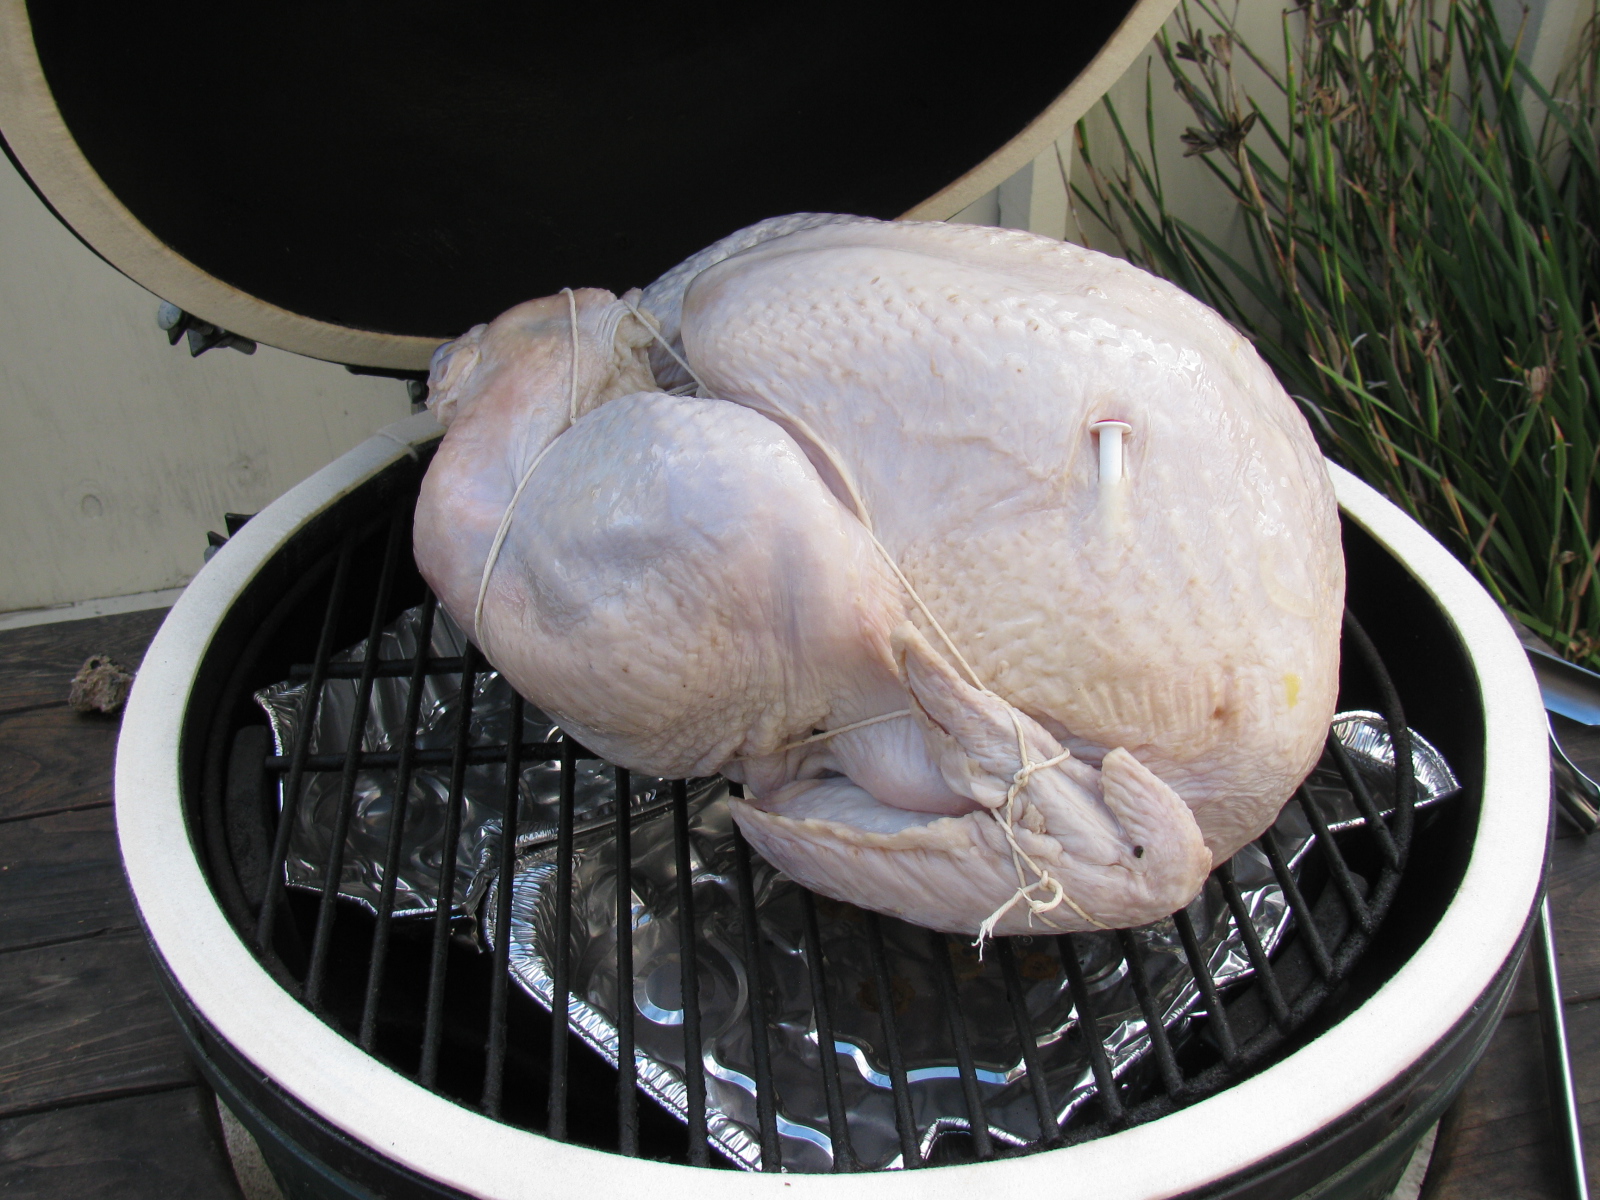
The BGE is set up for indirect grilling, and a drip pan is placed underneath. Unfortunately, this set up usually burns the drippings – will try using a traditional roasting pan to catch the juices next time. Not this bird has one of those pop-up doneness indicators – I usually ignore those and test for actual internal temperature.
-

-
Pop-up indicator says this is done, however, it is not. Total roasting time at 325 degrees F was 3.5 hours.
-
-
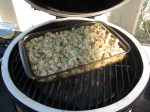
After the turkey was finished, there was plenty of heat and lump charcoal, so I decided to cook the stuffing in the BGE, too.

Colleen Jones earned a You Rock Award for her outstanding seminar on “ATS.”
I attended a seminar on ATS at the Orange County (CA) One Stop Center last year. It was the most useful and informative one hour session I attended, and so Colleen Jones gets one of my “You Rock” awards.
<<< Take a look at my LinkedIn update post to see the award >>>
Wait a second. What’s ATS you say? ATS means “applicant tracking system” – the filter used by companies to find potential employees. An infographic for the ATS is posted on the HireRight blog site.
I wouldn’t call the resume robots “smart” or “friendly” – but you must create a resume that is smarter and friendlier than the robot scanning your qualifications summary.
Like all weapons in today’s job market, the ATS is a double-edged sword – it can help or hinder companies seeking people to fill job opportunities, and it can help or hinder job-seekers looking for work.
The best advice is to understand what and where the resume robots are looking for – and then fill your resume or curriculum vitae (CV) with what the robots are looking for.
If this sounds a lot like SEO – search engine optimization – it is because it is. Placing the proper key words in all the proper places is what you need to feed the ATS – and get that interview invitation!
Announcing San Diego Mini Maker Faire 2013 – Visit the Maker Booth called “Not Your Grandpa’s Ham Radio”
Maker Faire – where art, science and technology crash together!
>> Click here for more info! <<

Debra Faris, Greg Johnson, Sven Johnston and Ted Robison – My LinkedIn Mentors – Rock!
In February 2013, LinkedIn said that I am among the Top 1% most often viewed profiles in 2012. I thought, shoot, I bet they said this to all of their members. . . .

In any case, I could not have done it without these great people sharing their expertise.
Now I am “paying back” as a volunteer LinkedIn instructor at the Saddleback Career Coaching and Counseling program in Lake Forest, CA
I should have done more homework on this part of the build process, since Factory Five Racing tells us they do not include the fuel system. This makes sense since it will depend on the engine. I have a 302 with an MSD Atomic EFI system, and it came with the (external) fuel pump and filters.
So now I have to figure out how to get from the fuel tank output tube to the first fuel filter, then to the pump and then to the EFI unit. I decided to install a return fuel line, based on the information in the MSD instructions, I hope this extra effort will be worth it.
I will make access holes and hatches for the fuel pump and filter, as well the rear suspension components and tali lights – this should make maintenance and repair easier.
Here are some pictures of the work done today.

Type 65 Coupe fuel pump possible location. This is the external pump that came with the MSD Atomic EFI kit. The first fuel filter will mount to the battery box.

Using CAD – cardboard aided design, the fuel pump mounting plate is taking shape.

Here is the fuel pump in its possible location.

The cardboard template is transferred to aluminum. The mounting plate is almost a quarter-inch thick, so it will be nice and sturdy. This piece will be drilled and painted later.
By the way – the fuel tank is still not in its final location – the right side mounting bolts are not long enough. I may just get a length of all-thread and make my own bolt for that side. The left side seems to be OK. Next on the “To Do” list is fill and bleed the brake system.
I painted and installed the slightly modified battery box from FFMetal this past weekend. Just to be different, I decided to paint the box white on the inside and black on the outside.
As you recall from my previous Coupe update, the battery box fits very tightly into the chassis – and I figured out a way to install the battery box without scratching up the paint – the trick is to install and build the box piece-by-piece into the chassis space. In other words, do not assemble the battery box and then mount it into the chassis – instead, build the box into the chassis.
NOTE: By building the battery box into the chassis, adjusting one side of the box inward (as described in my previous battery box notes) may not be necessary. Try a dry-fit before you drill the side of the box to change the dimension slightly.
This is actually easy to do, but difficult to explain. Here are some pictures of the freshly-painted battery box installation:

FFMetal battery box for the Type 65 Coupe – the individual parts are inserted into the frame one piece at a time, Cleco-ed into place, and then riveted. (Left side view.)

A close-up of the small cut needed on the left side of the battery box. This cut-out does not interfere with the battery – but the battery clamp bar may have to be moved, depending on where terminals, vents or filler caps are on the battery.

Another view of the two-tone battery box. I like the white interior, it makes it look nice and clean. Of course, a lid will cover everything later. . .

Another view. . .

The battery box with the supplied cover in place. Since I moved one side inwards, one cover screw does not line up properly. This does not bother me too much – I will install a small piano hinge at the upper side of the battery box, and the bottom two screws will hold the cover in place.
When the trunk floor panels are installed, I will make a cut-out to access the battery compartment. The instruction sheet shows how to make the cut-out in the floor panel, but I will make the cut-out with an easier technique that woodworkers use: A router and pattern bit. I will show how this is done when I get to that stage.
I may make a small finger-hole on the cover so it will be easier to open. Insulation and carpet will cover the entire trunk area later.