Archive for the ‘Automotive’ Category
The Factory Five Racing Type 65 Coupe is based on the Shelby Cobra Daytona. Only six of them were made.
On January 24, 2014, Daniel Strohl posted an article about this famous and important American racing car. Read the article:
Shelby Cobra Daytona becomes first vehicle on National Historic Vehicle Register
This is a new series from Heavy Duty Trucking and Today’s Trucking magazines. The first review is an excellent look at a classic “twin sticks” manual transmission (1957), and compares it to a modern push-button transmission. Go here:
http://www.truckinginfo.com/channel/equipment/video/detail/2014/01/ultimate-test-drive-video-twin-stick-to-mdrive.aspx
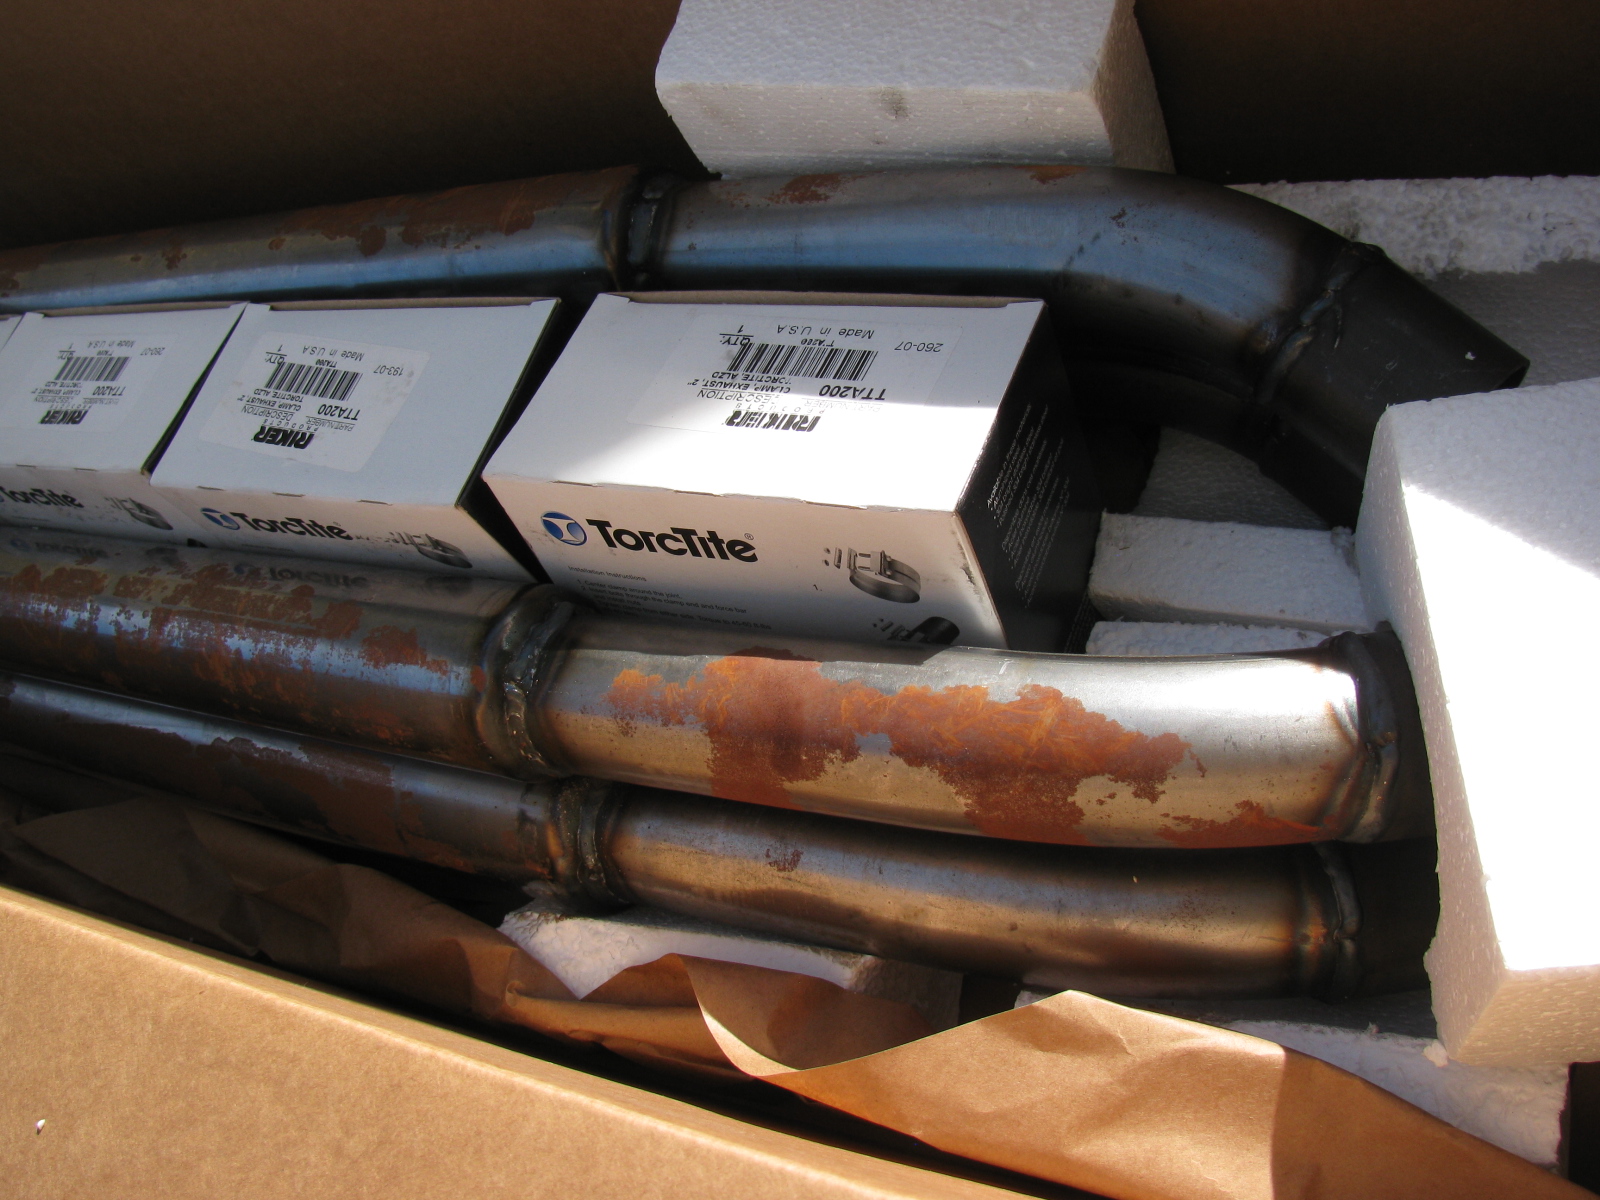
I got bored with figuring out the fuel line routing and filtering, and it was a nice warm day today, so I decided to paint the Coupe exhaust system pipes and silencers. Even though they were stored in a corner of my dining room, and were covered with oil, there was a lot of rust forming on the surface of the pipes. My kit is now a little over a year old, and I wanted to prevent further rusting.
Here is the box of pipes and associated mounting hardware from The Factory. . .

Type 65 Coupe Exhaust, Uncoated, from Factory Five Racing, after one year
There is an option to get the pipes ceramic coated, I probably should have ordered the exhaust with the coating. I noticed the brochure on the Factory Five Racing website has the exhaust listed as ceramic coated at no charge. I wonder why I missed that part?
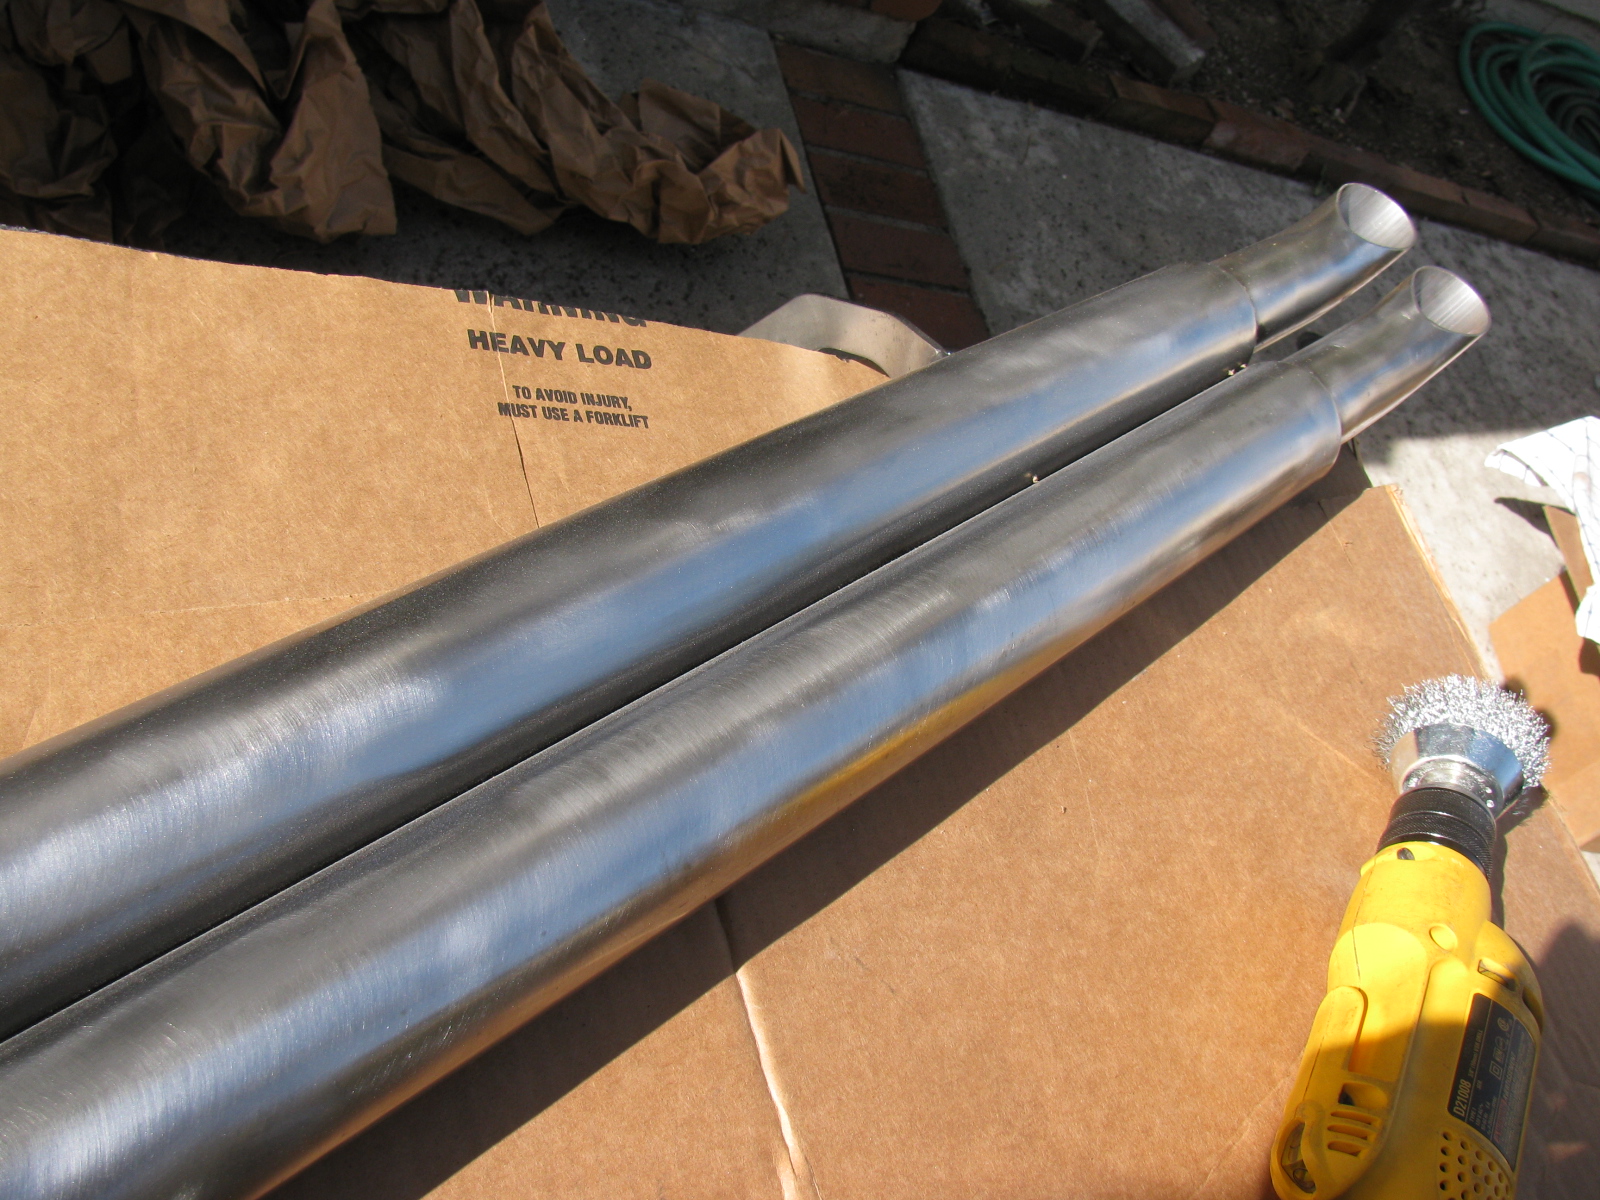
I used silver Rustoleum BBQ paint (Ultra) to finish the exhaust. But first, I prepped the pipes with wire brushes, to remove the rust and roughen up the surface, and then wiped them with acetone to degrease so the paint will stick better.

I used a wire brush on a drill motor to get the rust off and roughen the surface.

Type 65 Coupe side exhaust pipes painted with silver BBQ paint – I think it looks OK.
The BBQ paint is a bit soft, I think this is because it needs to expand and contract when heated and cooled. But it will be easy and cheap to touch up.
I am not sure what the final exhaust side pipe color will be, so I sprayed three coats of the silver on just to prevent further rusting. I may change the color to black, since I want the main body to be white.
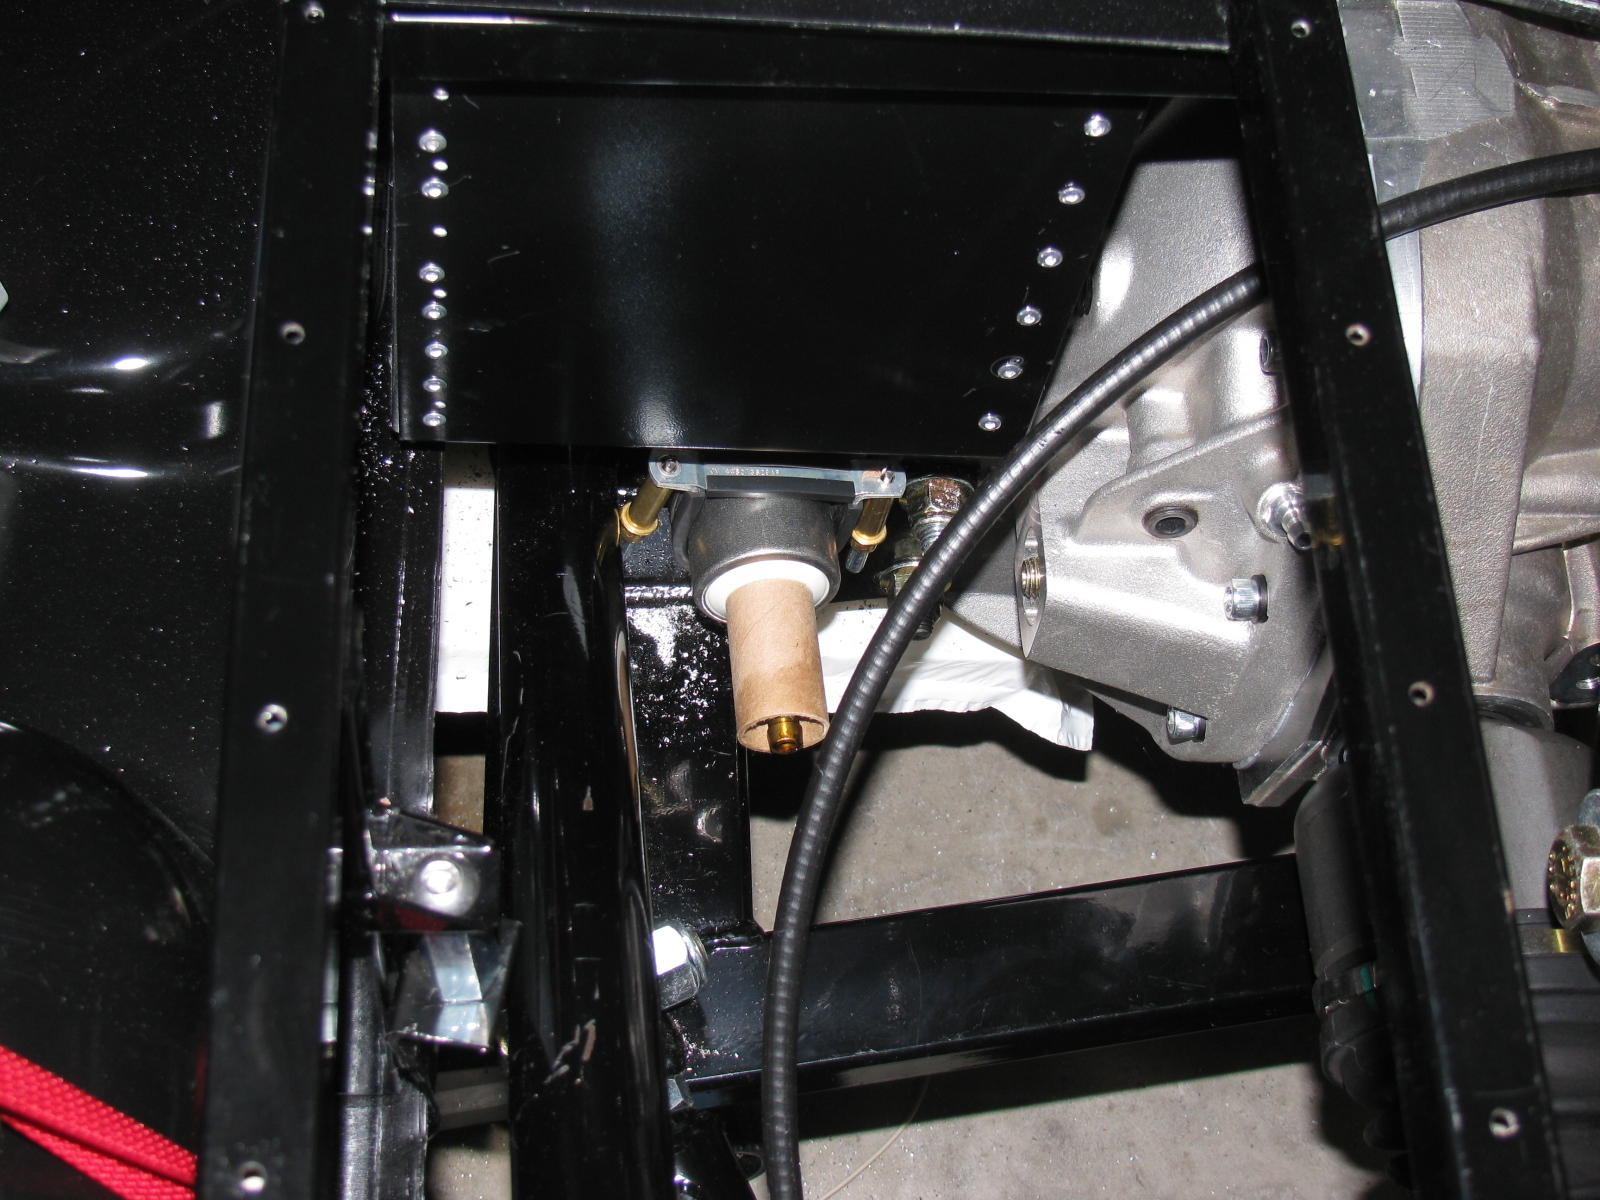
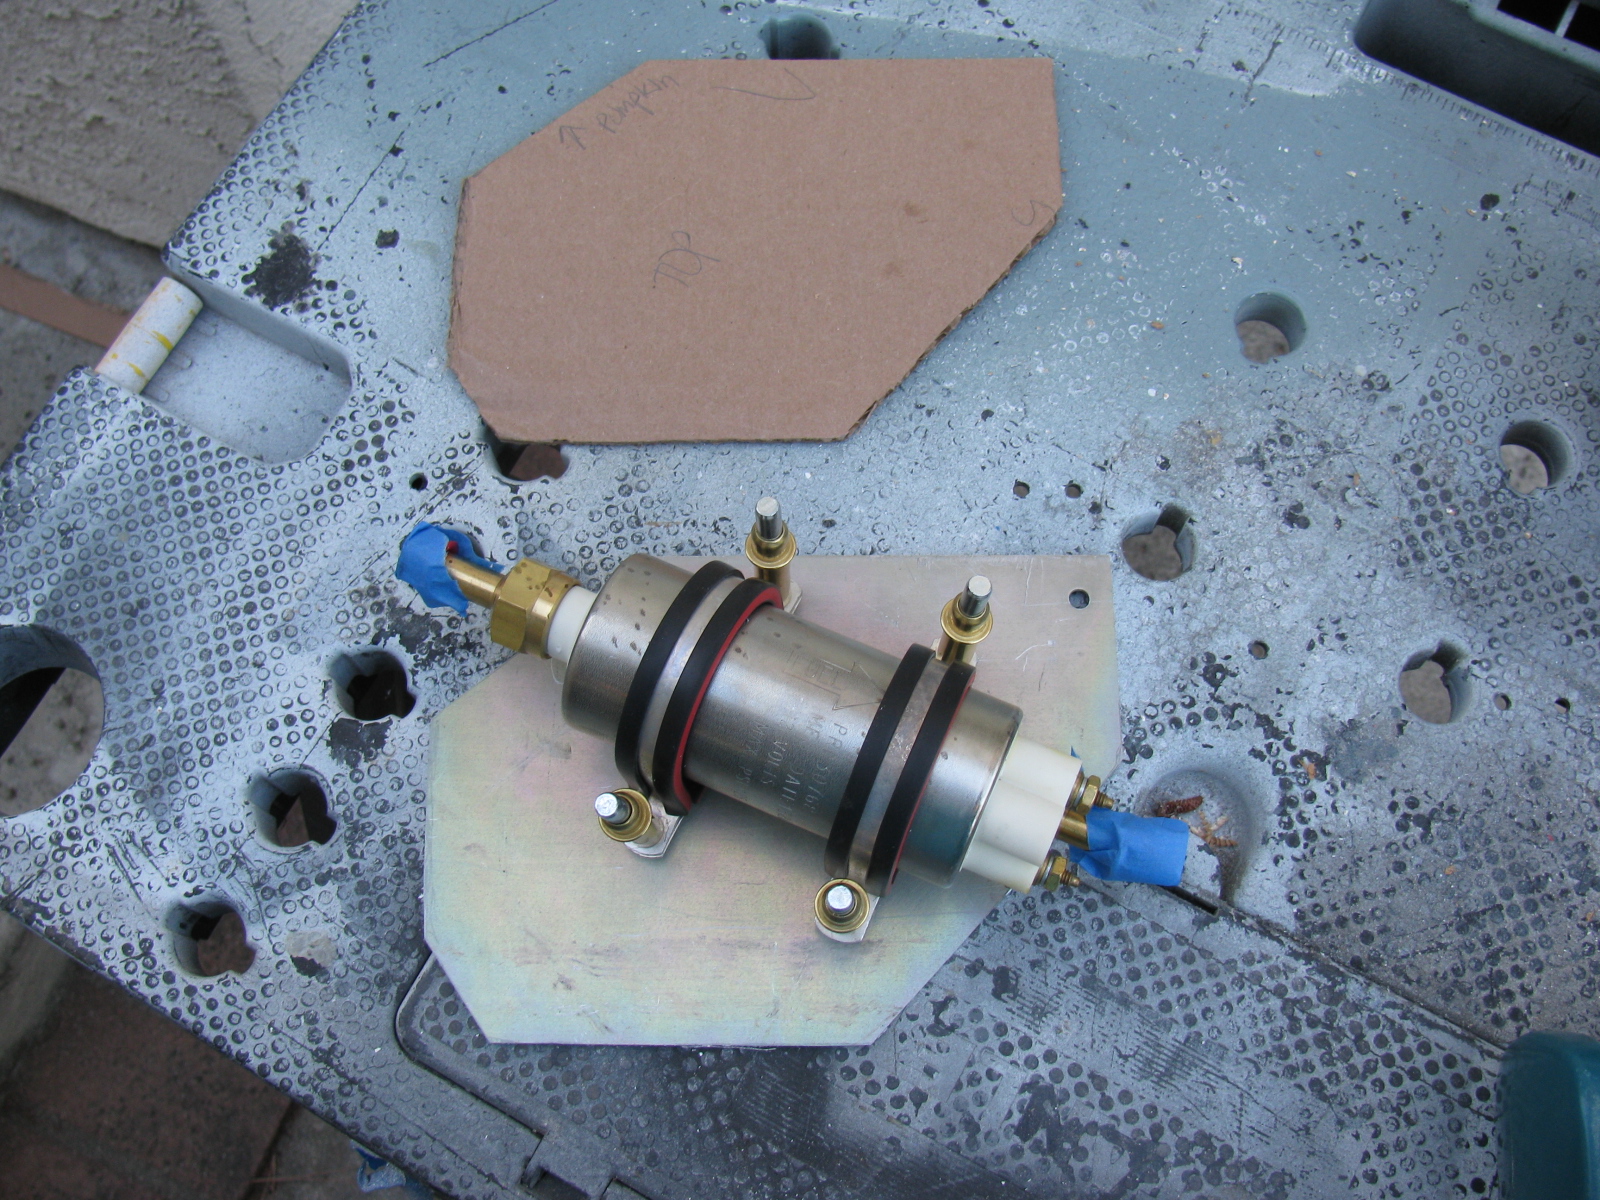
I did manage to mount the pre-filter for the fuel system. My 302 is fuel injected with an MSD Atomic EFI system, and came with most of the parts, including the fuel filters, hose, and external fuel pump. The first filter mounts where the Factory Five fuel filter is located, near the quad shock mount on the right side of the chassis. The MSD-supplied filter is smaller than the one supplied in the kit, so I had to figure out how to mount it. I am using a pair of electrical conduit clips to mount the first filter, as shown.

Electrical conduit clips are used to mount the first fuel filter to the chassis
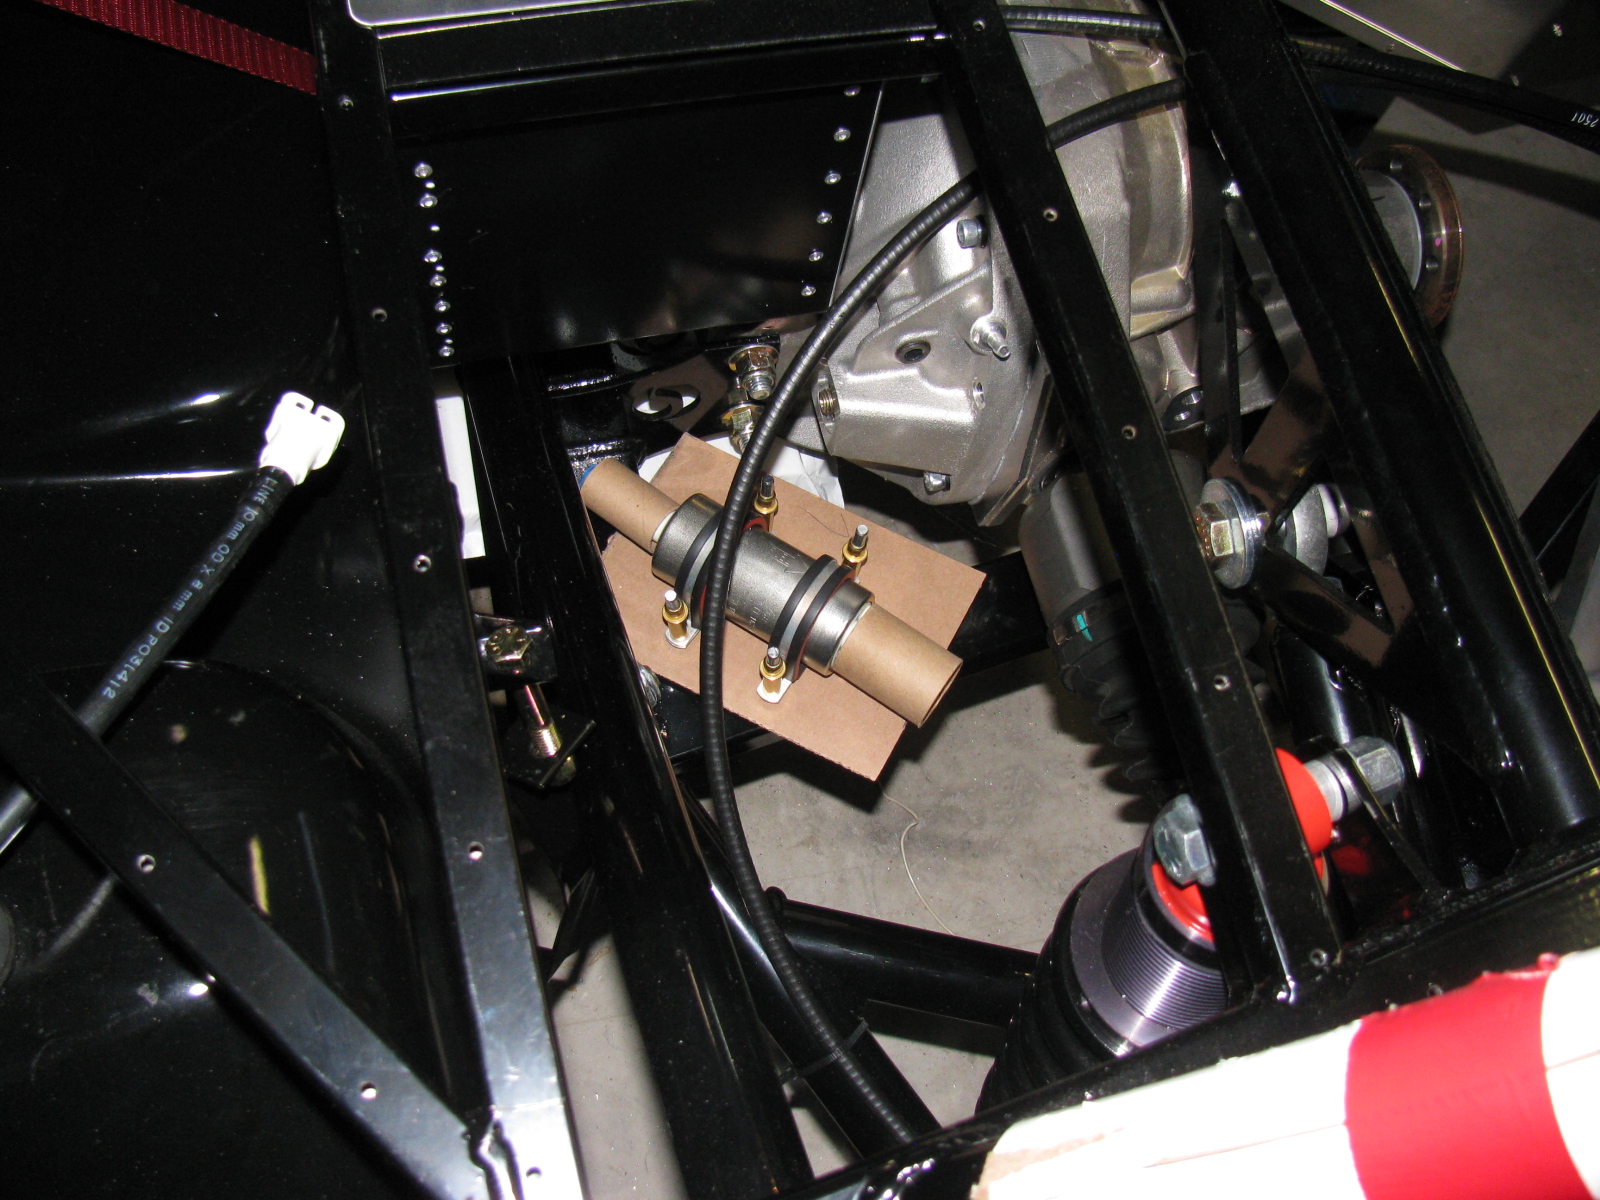
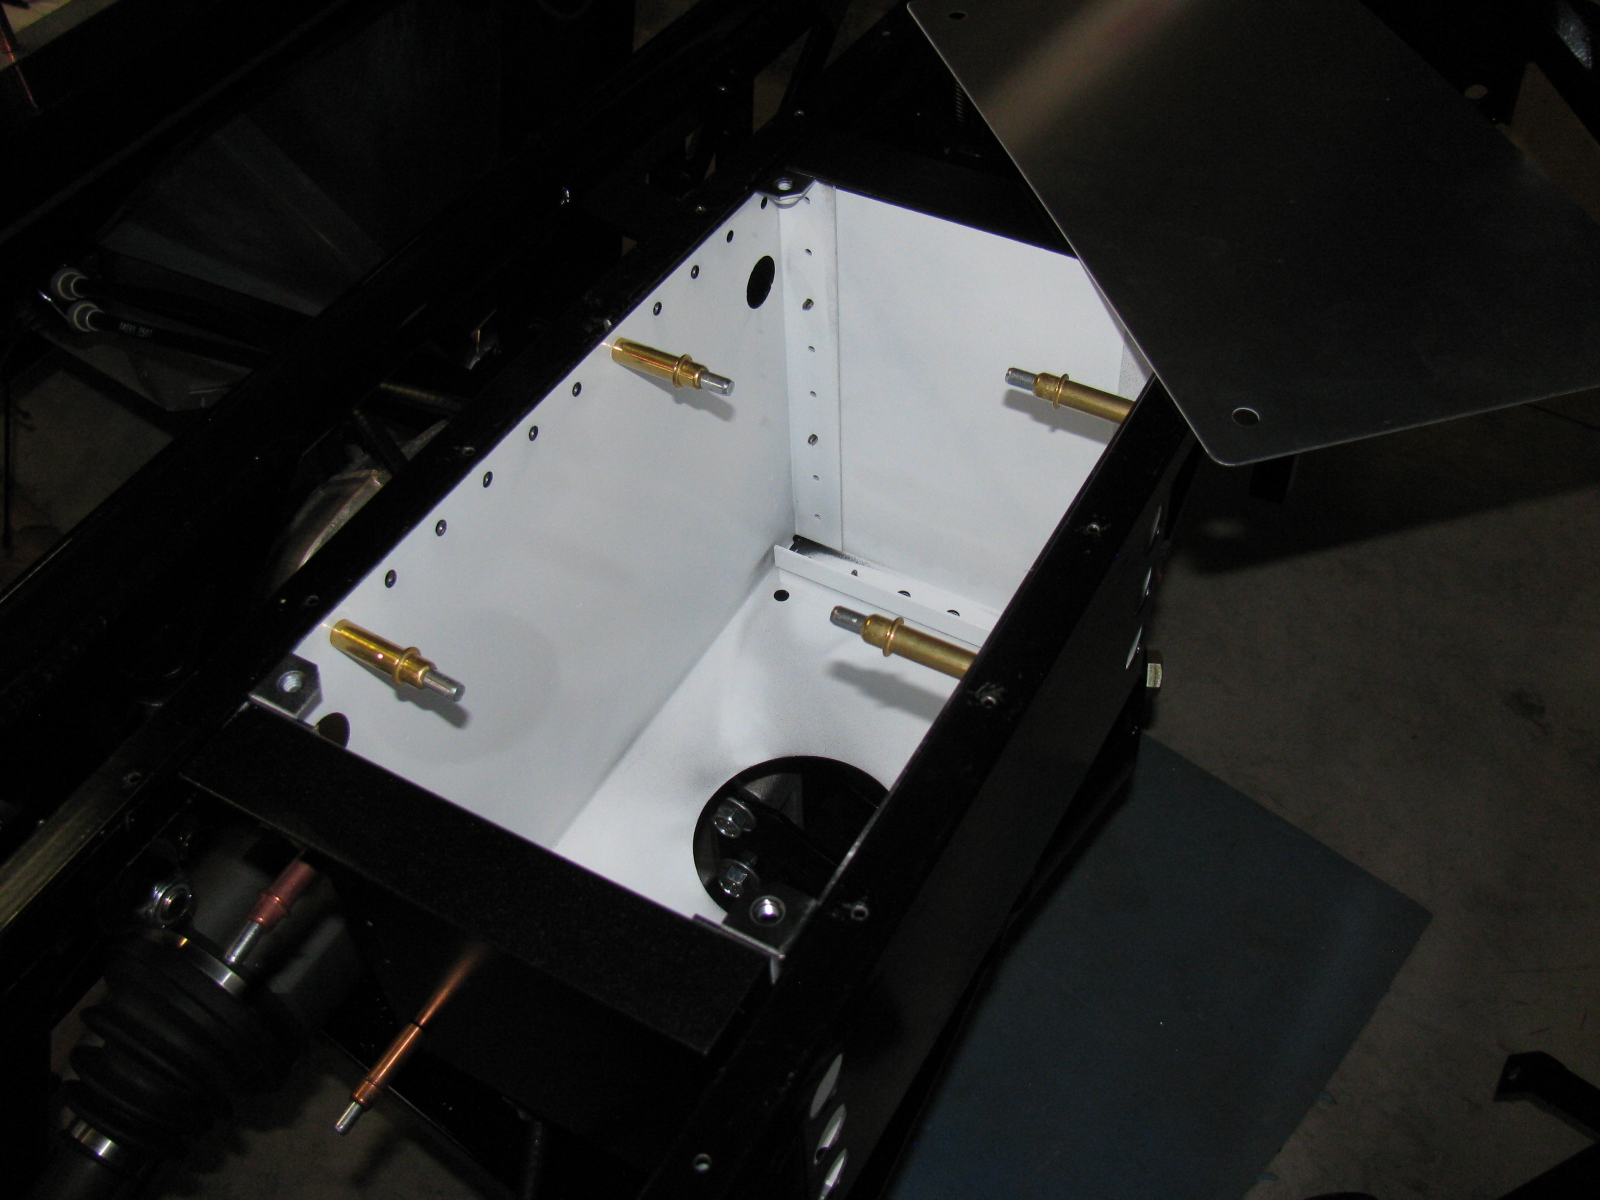
The fuel pump will mount to the bottom of the Factory Five Metal battery box. If you have IRS and want to use the same box, you must modify the battery box slightly, as mentioned in an earlier post. In addition, you will have to figure out how to make the battery box removable, since it will block the differential filler plug.
I will be mounting the battery box with nuts and bolts, and mount it so that it can tilt upwards for access to the rear end filler plug. More details and pictures will follow when I get to that chore. Here’s a sneak peek at where the external fuel pump will be mounted.

Type 65 Coupe with IRS – battery box and external fuel pump mounting location
I should have done more homework on this part of the build process, since Factory Five Racing tells us they do not include the fuel system. This makes sense since it will depend on the engine. I have a 302 with an MSD Atomic EFI system, and it came with the (external) fuel pump and filters.
So now I have to figure out how to get from the fuel tank output tube to the first fuel filter, then to the pump and then to the EFI unit. I decided to install a return fuel line, based on the information in the MSD instructions, I hope this extra effort will be worth it.
I will make access holes and hatches for the fuel pump and filter, as well the rear suspension components and tali lights – this should make maintenance and repair easier.
Here are some pictures of the work done today.

Type 65 Coupe fuel pump possible location. This is the external pump that came with the MSD Atomic EFI kit. The first fuel filter will mount to the battery box.

Using CAD – cardboard aided design, the fuel pump mounting plate is taking shape.

Here is the fuel pump in its possible location.

The cardboard template is transferred to aluminum. The mounting plate is almost a quarter-inch thick, so it will be nice and sturdy. This piece will be drilled and painted later.
By the way – the fuel tank is still not in its final location – the right side mounting bolts are not long enough. I may just get a length of all-thread and make my own bolt for that side. The left side seems to be OK. Next on the “To Do” list is fill and bleed the brake system.
An article in Fleets and Fuels says, “…30 compressed natural gas-fueled trucks for Saddle Creek in Texas (and one in Louisiana), and 55 liquefied natural gas-fueled trucks for Blu in Utah and Georgia…”
Read the complete story here.
I really like the photo of the CNG truck being fueled – you can see the Agility Fuel Systems Fuel Management Module (FMM) in the picture. . .
Click here to see what I mean. . .
I painted and installed the slightly modified battery box from FFMetal this past weekend. Just to be different, I decided to paint the box white on the inside and black on the outside.
As you recall from my previous Coupe update, the battery box fits very tightly into the chassis – and I figured out a way to install the battery box without scratching up the paint – the trick is to install and build the box piece-by-piece into the chassis space. In other words, do not assemble the battery box and then mount it into the chassis – instead, build the box into the chassis.
NOTE: By building the battery box into the chassis, adjusting one side of the box inward (as described in my previous battery box notes) may not be necessary. Try a dry-fit before you drill the side of the box to change the dimension slightly.
This is actually easy to do, but difficult to explain. Here are some pictures of the freshly-painted battery box installation:

FFMetal battery box for the Type 65 Coupe – the individual parts are inserted into the frame one piece at a time, Cleco-ed into place, and then riveted. (Left side view.)

A close-up of the small cut needed on the left side of the battery box. This cut-out does not interfere with the battery – but the battery clamp bar may have to be moved, depending on where terminals, vents or filler caps are on the battery.

Another view of the two-tone battery box. I like the white interior, it makes it look nice and clean. Of course, a lid will cover everything later. . .

Another view. . .

The battery box with the supplied cover in place. Since I moved one side inwards, one cover screw does not line up properly. This does not bother me too much – I will install a small piano hinge at the upper side of the battery box, and the bottom two screws will hold the cover in place.
When the trunk floor panels are installed, I will make a cut-out to access the battery compartment. The instruction sheet shows how to make the cut-out in the floor panel, but I will make the cut-out with an easier technique that woodworkers use: A router and pattern bit. I will show how this is done when I get to that stage.
I may make a small finger-hole on the cover so it will be easier to open. Insulation and carpet will cover the entire trunk area later.
Great announcement from Paper Transport in Green Bay, WI, USA. Nice mention of the Agility Fuel Systems and how their natural gas fleet is both cost-effective and clean. Click here to see the story….